Ms. Ruin's Playthings


"The imagination imitates. It is the critical spirit that creates." -Oscar Wilde

Showing posts with label tim holtz. Show all posts

Saturday, July 26, 2014

Altered Gift Bag

Hello friends --here are a couple of quick ideas to alter gift bags.  I went to the store and had a bag in hand and then I thought, "What am I doing?  I have all sorts of stuff at home to decorate a bag AND I have bags."  So this is what I made...


The bag in the back was stamped with a vintage baby buggy and then I adhered a flower to it.  The bag in the front took a little more work and a 3rd degree hot glue burn, it was worth it though!  I basically made a little chalkboard that they can remove and keep and then write their own messages.  Here are the steps for the second bag...

  • Paint a piece of chipboard (size of your choice) using at least two coats of Chalkboard Paint.  Allow chipboard to dry.  (Tip:  the chipboard will curl but when the paint dries all the way through, the chipboard will flatten).  If you don't have chipboard, try using a thin wooden board.
  • Adhere Maya Road Vintage Lace Tape around chalkboard.
  • Wrap hemp cord around chalkboard and secure in the back with a knot.  I also used hot glue to reinforce the position of the cord.
  • Glue chalkboard gift bag.
  • Embellish hemp cord.  I used Basic Grey, Maya Road, Recollections, Tim Holtz and Prima.

TA-DA!


The bags were a big hit and the best part is that my friend and her hubby now have a little chalkboard to use in their baby boy's nursery.

Until next time, peace, love, and extra special gift bags!


Thursday, July 3, 2014

Deserted Beauty

Hello  friends!  Thanks for stopping in to see my latest project.  This mini book is actually a design team project for The Crafty Scrapper.  When I first received it I wasn't exactly sure what I was going to do with it but at the last minute, it all just sort of came together.  Plus I had an opportunity to fuse my love of paper crafting with my love of urban and not so urban exploration.  You see, when I'm not painting chipboard I enjoy exploring abandoned places and capturing images to share with others.  Those of you who follow my photography are familiar with my motto, "I find beauty where most see atrophy."  I hope you are able to see the beauty too.


This lovely camera chipboard album is by the fine folks at Leaky Shed Studio and can be purchased at The Crafty Scrapper.  I also want to mention that all of the gorgeous paper I used in this album is from the "Accomplished" line of papers by Authentique.  You can find this paper right by the checkout!  A little bit about the cover which is typically the most embellished part of the book in my projects...I wanted to create a contrast between something beautiful and something, well, a bit on the mucky side because that's definitely what this book is about.  I chose a soft damask print for the background and then a bold brick print for the accent pieces of the camera.  All of the paper embellishments including the alphabet are by Tim Holtz and the flowers are by Prima.

Lets explore the inside of the book and don't forget that you can click on the images to view them larger.


This page holds a couple of pictures of an abandoned elementary school located in Premont, Texas.  I used a pocket from an old library book to hold my photos and a card that tells you a little bit about the photos.  


In case you're wondering how I got the pretty text on the Maya Road kraft tag, I simply printed the text on a regular sheet of paper, adhered the tag to the paper over the text, put the paper back in the printer and reprinted the text.  Be careful not to jam your printer!  If I had a typewriter, I would have used it instead. 


I really liked the way this turned out.  I'm not gonna lie, I was so frustrated with this page that I wanted to put the pictures sides by side, glue the Maya Road light bulb in the middle and call it a day.  But I walked away, got some sleep, and in the morning I churned this out with ease.  


The photo on the left flips open so that you can see the entire picture on the right and you can also read some details about these photos.  And just in case you can't see the print, these photos were taken in the ghost town of Medicine Mound, Texas which is located between Amarillo and Dallas.  We found the structural remains of a filling station and some really neat relics including the gas pump.  We continued down the road and drove through a field (remember, not so urban exploration) and found a very old grade school.  You can see that edifice on the cover of the book.  I don't think class will ever be in session again.  Or will it?


This old tractor was found next to an abandoned gymnasium in Shamrock, Oklahoma.  The town has few residents left and it appeared that the majority of the buildings were rundown.  I didn't do too much with this page other than cut along a couple of the clocks to tuck my photo into position.


I really like this page despite it's simplicity.  Sometimes when you have captivating photos, you don't want to clutter the page too much or you have one art form taking away from another.  I think a piece of burlap and hemp twine were just the right accents.  The Baker Hotel is located in Mineral Wells, Texas.  Is it haunted?  Likely.  But I'm drawn to it's towering beauty, sadly it lays in ruin.


On the flip side you'll find this image of an abandoned auditorium in Premont, Texas.  I am absolutely in love with this place but only have an opportunity to drive by it twice a year on my way home to South Texas.  And 9 times out of 10, my husband does not want to stop.  I don't know that I'll ever go back in there but I can tell you that I have been in there three times, alone, in the silence.  I have stood behind the curtains and peered out past the stage into an audience of empty seats.  Listen...you can almost hear them applauding.  


Who doesn't love old barns?  I know so many people that do!  How I wish I could have gotten closer to this old barn in Tennessee.  Again, the printed text on the kraft tag was made with my deskjet printer.  The pocket frame is by Tim Holtz and the Frozen Charlotte doll is by my friend artist AND author, Lisa Pace.


Does Tim Holtz have some of the best hardware or what?  I love all of these little trinkets.  This photo is really special to me.  I had seen this house so many times on I 35 North from Waco to Dallas.  One day, while traveling alone, I finally exited off the highway and spent a good 30 minutes studying a map and driving down side road looking for this house.  Well, I found it.  It was on a dirt road that had not been traveled in so long that the grass and brush had started growing over the road.  That's why I had difficulty finding the house!  But I found it --I traveled down the road with nothing and no one else in sight.  I reached the dead end and there I found this magnificent beauty.  I took my photos and then just stood there and wondered what her story was.  If those walls could talk, what story would they tell me?
  
For this last page, I used a really neat technique that you will want to try on your next project.  Hold off on the coffee, you're going to need a steady hand for this.  


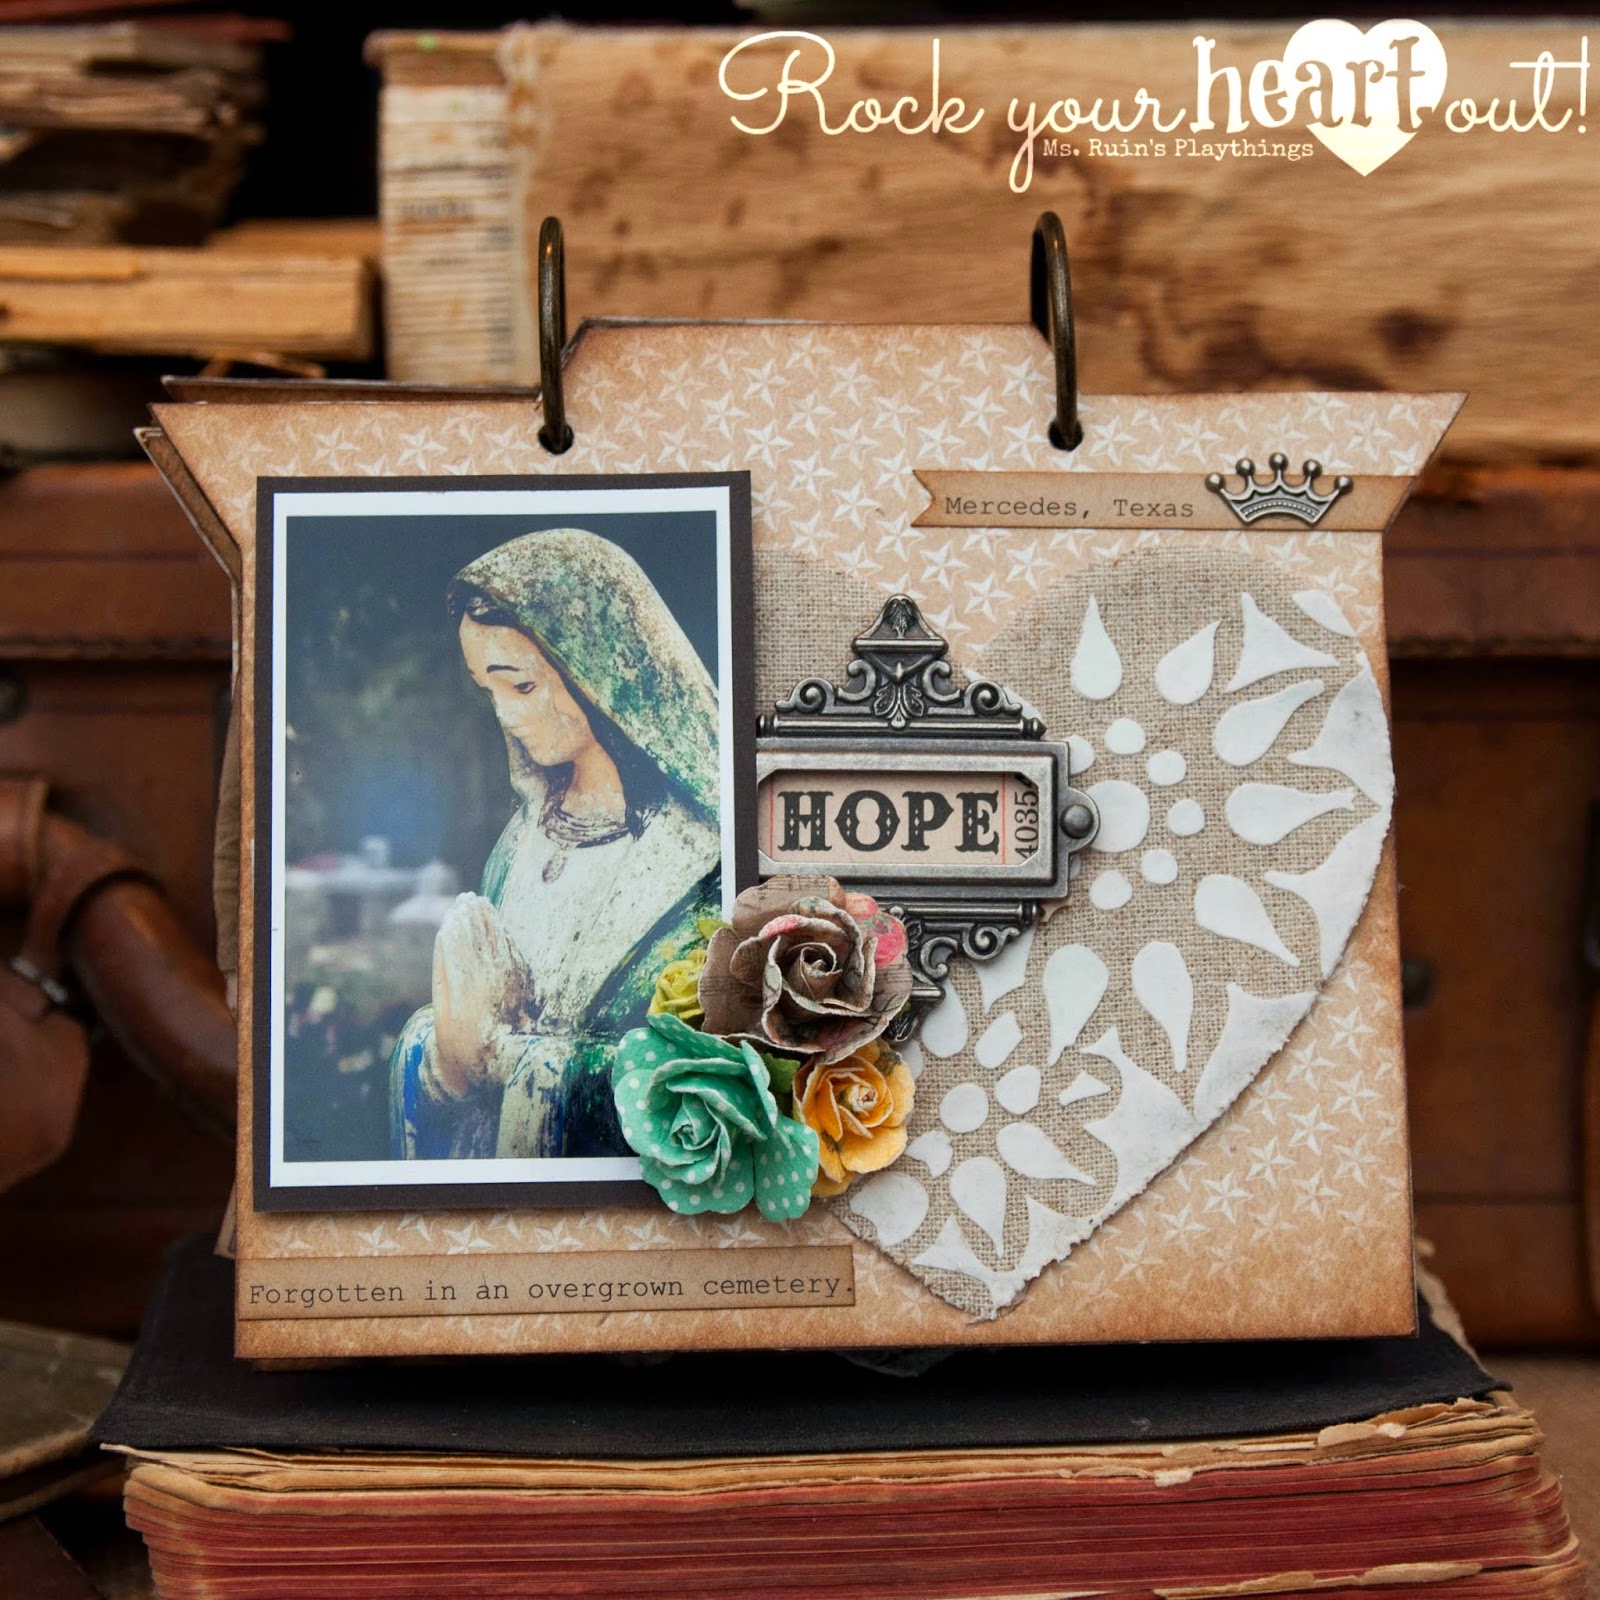
For this page I took a Maya Road linen heart and laid a stencil over it and then gently applied a thick coat of Wendy Vecchi's Embossing Paste in white.  I promise, once you do this you will want to do it over and over...just imagine the possibilities.  I also stenciled some beautiful black birds on other linen hearts for a different project.  About the photo:  The gorgeous statue on this page was found in an overgrown cemetery in South Texas.  I doubt that old place has many visitors, but I have a hunch that this statue restores hope for the disregarded.


I hope you enjoyed my book.  If you would like to see it up close, please stop by The Crafty Scrapper in Waxahachie, Texas and tell them you are there to see Sonia's latest book!  And don't forget that you can also follow my art and my photography on Facebook and on Pinterest (the links are on the right).  Until next time...take flight!

Ms. Ruin

Thursday, April 3, 2014

Altered Mason Jars

Hello bloggers and blog readers.  I've got a few projects I've worked on lately that I want to share with you but for today we'll zero in on a couple of gorgeous altered mason jars.

As you know, I run Artsy Fartsy, a swap community on Facebook, with the help of my friends DeeDee and Genie.  Each month we host a swap and for the month of March, DeeDee hosted an altered mason jar swap.  My partner told me she enjoyed vintage styling and she lives in Louisiana so a fleur-de-lis would be to her liking.  So with that little bit of insight I got to work.

Ms. Ruin's Supply List:
Basic Crafting Tools 
Alcohol Inks and a dauber
Paper Flowers
Embellishments
Twine
Tissue Paper


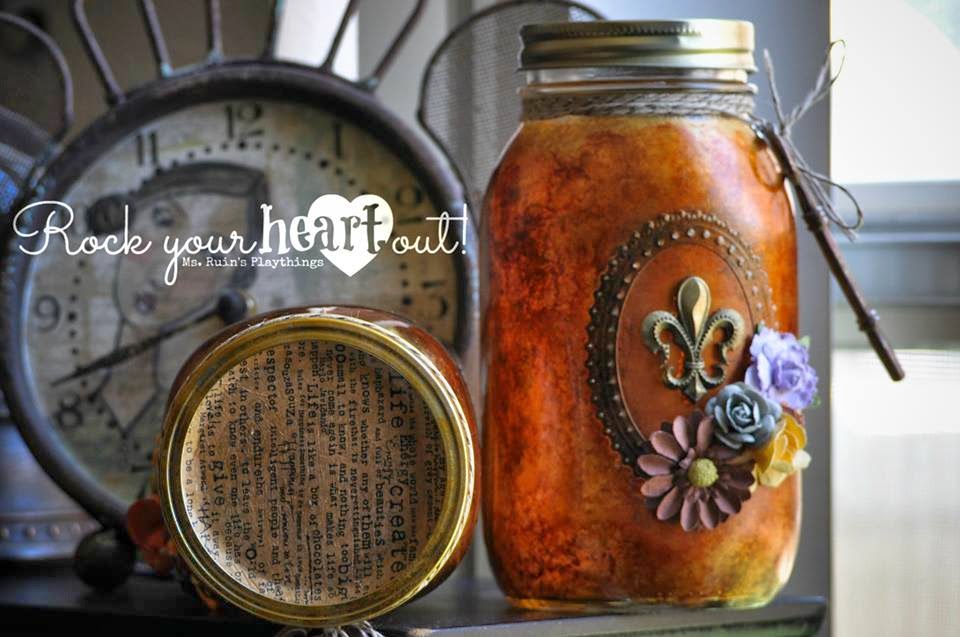
The first step I took to create this gorgeous project was that I applied a decorative oval shaped sticker to the jar.  This particular one is from Tim Holtz's Idea-Ology Industrious Stickers/Borders.

I then started inking the jar with alcohol inks on the outside only.  I used about three or four different colors, I believe they were ginger, butterscotch, raisin, and gold.  I applied one color at a time.  Keep in mind that you don't have to cover the entire jar with each color.  I however did cover most of the jar each time I applied an ink.  The key to getting that marbleized look is to simply tap the jar with the dauber repeatedly --kind of like using a sponge when sponge painting.  The gold ink was the only metallic I used.  I made sure to make it the last ink that I applied all over and then I went back over it here and there with other colors.  (Helpful tip:  Keep alcohol blending solution on hand just in case you don't like the way your project is looking, you can apply the blending solution and the inks will wipe right off. )

The ink dries very quickly so I was able to move on to the next step within seconds.  I wanted to bring out the details of the sticker a little so that they wouldn't get lost behind all of the inks I had just adhered so I took a sanding black and just scuffed it up a bit.  Since the sticker is paper, white was exposed.  I went back and dabbed alcohol inks over it.  You can also use distress inks for this.  

I took a handful of flowers from my flower stash and adhered those to the bottle with hot glue.  And trust me, those babies are not coming off of that jar without a fight.  I then applied the fleur-de-lis which is an embellishment I had in my collection for many years.  I used E6000 to adhere the embellishment.  One of the final steps was to wrap twine around the neck of the jar and then I tied down the key.  There is one final step which I will cover in a sec.


I actually had two jars on hand so I decided to decorate a second jar for a friend.  I used all of the same steps except that I stenciled the first letter of her name on the jar rather than using a fleur-de-lis embellishment.  When it was all said and done, I kind of wish I had also used an embellishment because she too is from Louisiana!  But I think it's just as pretty and personalized.  :)


Alright, the final touch on these jars was adding this printed tissue paper to the lids.  Remember, mason jars have those little plates that come right off so what I did is I traced the circle onto printed tissue paper, this paper is by 7 Gypsies.  Then I applied glue and seal to the plate and adhered the tissue.  Once that was dry I put a coat of glue and seal over the tissue to protect it from tearing.  Ta-da!  Project complete.


What's next at Ms. Ruin's Playthings?  In my next post I'll be showing you these sweet little hoots that hatched in my craft room over the weekend.  Until next time...

Peace, love, and alcohol ink!


Monday, January 28, 2013

Uncaged


My very latest "completed" Design Team Project is a decorated Maya Road linen heart.  We were each asked to embellish the heart with our own "style".  The goal is to describe who we are and what we like to use in our day to day projects.  Of course this was a no-brainer for me.  I used some of my all time favorite products from Maya Road, Tim Holtz, Ranger, and Prima (product list at end of post).  But we'll get into that in just a sec.

So why "Uncaged"?  Well, it's simple.  I have always been a creative person.  I can thank my very talented mother for this.  She can draw.  I cannot.  But I did inherit other artistic traits from her.  Thanks, mamacita!  Back to "uncaged"...well, as most of you know I was in a marriage many years ago that was riddled with domestic abuse.  I was not allowed to create anything, to keep journals, to write poetry...nothing.  This is devastating to someone like me who needs to express herself with words, with art!  I can remember keeping a spiral notebook hidden in the back panel of my nightstand.  On the nights that were the most traumatic, I would pull it out after he was asleep and I would write in it...in the dark.  I couldn't see lines, but so long as I could feel the paper, well, that was enough for me.  That notebook was my only friend for several years.  When I visited the notebook, I was free!  But any other time, I was a prisoner.  ::exhale::  But that is over now!  And guess what?  I can create whatever the heck I want too!  Try and stop me.  I use a lot of birds in my work because I wanted so badly to be like a bird.  I wanted the courage to fly away, to escape, to break the confines of my cage.  Although that time of my life is now over, I still can't fly.  Well, at least not physically.  But every other part of me has the freedom to soar!  

"Most birds were created to fly.  Being grounded for them is a limitation within their ability to fly, not the other way around.  You were created to be loved.  So for you to live as if you were unloved is a limitation, not the other way around.  Living unloved is like clipping a bird's wings and removing its ability to fly.  A bird is defined not by being grounded but by his ability to fly.  Remember this, humans are defined not by their limitations, but by the intentions I have for them; not by what they seem to be, but by everything it means to be created in my image.  Love is not the limitation; love is the flying.  I am love."  -William P. Young, The Shack

Alright --are you ready to see the entire project?!  Here we goooooooo...


Lets work from the bottom up...this wooden cage is by Maya Road.  I dabbed it with gold adirondack paint by Ranger.  Then I journaled the word "uncaged" on a piece of scrapbook paper and adhered it to the cage.  I decided to add a pink flower to soften the idea.  The wing is also by Maya Road and it is actually acrylic!  I lathered one side of the wing with glossy accents, also by Ranger, and then adhered it directly onto vintage music paper.  Once it was dry I simply tore away the excess paper.  This was easy to do as the paper was very old and brittle.  If you are using newer paper you may need to use scissors.  


I have been playing with polymer clay lately.  I'm new to the clay world but I can only imagine possibilities!  I was looking for a bird mold but didn't have any luck in that department.  But hey, craft people are resourceful so instead I pressed a Maya Road wooden bird into to the clay and used it as a stencil.  I popped him in the oven for 15 minutes --I guess you can say I had a bird in the oven.  ;)  Anyway, once he was cooled off I dabbed him with various alcohol inks.  I don't recall which ones I used, I tried about 4 different shades and finally got this pretty iridescent look.  I definitely used Raisin and Gold but after that I don't recall.  If you decide to use alcohol ink on clay and you don't have an extra piece of clay but don't want to commit to a color --ink the backside of your project for testing purposes.  ;)  My last steps were stamping the word "soar" and outlining my little fella with a black pen.  Oh!  Quick note about the "soar" stamp.  That word, plus the ones I used on the heart are from a new art journaling stamp set by Maya Road.  GET.THESE.STAMPS.  I promise, you will love them and you will use them often.     


Another medium I LOVE to use is cardboard.  And it's free!  In this piece I cut out a heart from corrugated cardboard and then painted here and there with Mahogony Crackle Paint by Ranger.  The keyhole is from the Idea-ology line by Tim Holtz.  I also used alcohol inks on it.  The crown is chipboard by Maya Road, painted with Gold Adirondack Paint by Ranger.

So there you have it!  I hope you enjoyed my project.  I am shipping it off to The Crafty Scrapper today.  I almost can't wait to get it back so that I can hang it in my studio.  In my next blog post owl feature a couple of fellas that are quite the hoot!  You'll have to come back and meet my new friends.  ;)  I will leave you now with the product list for this project.  Peace, love, and taking flight!

Product List (Click image at beginning of post to see large view of most products used):
  • Maya Road Linen Heart
  • Prima Paper Flowers (the best!!!)
  • Maya Road Wooden Bird
  • Black Sculpey Polymer Clay
  • Maya Road Chipboard Crown
  • Maya Road Art Journaling Stamp Set (LOVE!!!!)
  • Ranger Distress Crackle Paint
  • Maya Road Acrylic Wing
  • Maya Road Wooden Birdcage 
  • Tim Holtz Idea-ology Keyhole
  • Ranger Adirondack Alcohol Inks
  • Ranger Adirondack Acrylic Paint Dabber in Gold
  • Vintage Piano Music Sheets

Saturday, June 9, 2012

Anything Goes

I decided to join the Smudgy Antics Challenge this week with a theme of "Anything Goes".  This is my first challenge with this group so I'm excited and I hope that they like what I bring to the table.  Here's a little art therapy --something I created this morning as the challenge ends today.  My anything goes is about foolish hearts.  I was inspired by a poem I wrote where I question my own heart and ask "what are you good for anyway, you're nothing but trouble."  Face it, we all play the fool at some point in our lives...I'm not afraid to pour that into my art.  So without further ado, I present you with my foolish heart. 

I love layers and I love texture.  So I REALLY LOVE this project because I got to use both techniques.

I first took a canvas that already had a black flocked design on it.  I primed it with a spray primer and then painted over it with bronze reactive acrylic paint.  I did a base coat and then added a second coat, at which point I sprayed it down with Patina.  I set it aside to dry and I moved on to the next layer.  I took a wooden slab --I think this measures about 4"x4".  I adhered a grunged up photo of myself and sanded the edges.  I sanded the edges and then stamped silver scroll work on both sides of the photo (over my black hair).  I painted the edges of the wooden block with black acrylic paint and then set it aside to dry as well. 


Then I moved on to the focal point of this mixed media piece --the foolish heart with all of it's little secrets.  The key is by Tim Holtz...I sprayed patina directly onto it to give it a bit of a mossy look.  I also took a porcelain crown that was white and I painted it with reactive acrylic paints as well.  I think I used brass on the crown.  I sprayed it down with Patina and then set it aside to dry.  While the key and crown did their thing, I went ahead and worked my magic on that little foolish heart.  All the while I was thinking that I really wanted to journal but I was struggling with "where" on my project I was going to have room for journaling.  I kept that in the back of my mind as I started working with the heart.  I took a thick piece of cardboard and stamped the heart on it.  I cut it out and when I was cutting it I noticed that the layers of cardboard were easy to peel back.  I knew exactly where I would do my journaling!  You'll see soon enough.  I punched two holes on the left side of the heart and wrapped and tied hemp through the little holes and made a knot.  I then glued lace to the backside of the heart, and glued the key and the crown to the front of the heart.  HOT GLUE IS YOUR FRIEND.  :D  And now to the really cool part...

I split the cardboard in half with my fingers --just pulled away at a nice thick healthy corner and I added my journaling to the inside "My foolish heart...what are you good for anyway?"  Ta da!

Thanks for looking and I hope you enjoyed my foolish heart project!
Y Ms. Ruin

Monday, May 21, 2012

What doesn't kill you...

There are many sides to being a victim of abuse.  Some days I feel like I have no sides, I am just a black mass, bouncing around the walls of life –gravity working against me, for I have endured emotional, physical, mental, and sexual abuse that spanned more than half my age.  It’s easy to let those experiences define me.  It’s human nature.  I have self-pity too.  But I’m blessed that the majority of the time I am strong in the face of adversity.  Hell, if I wasn’t going to get myself out of these abusive situations, well mainly my domestic situation, why would anyone ever want to extend a lending hand?  “She deserves it…she won’t leave him.”  When you allow a sadistic human being to have an inch of you at your weakest, they will continue to break you down…daily, hourly, minute after minute…even when they are silent.  I WAS a victim.  Today, I AM a survivor. 
As I mentioned earlier, there are countless sides to being a victim –each one just as complex as the previous.  Today I’m writing about survival…the feat of coming out on the other side.  For some it is liberating and empowering, however others don’t recover long enough to function in any type of normalcy and they quickly fall back into the pattern of being abused.  I am thankful that I have been able to love myself again and I don’t have a problem sharing my own experiences with others.  I get it; some people don’t want to share the hurt that they have endured in life.  Quite the contrary for me, scrapping the hurt (clever, I know) is therapeutic.  So this weekend I scrapped the hurt and poured my scarred heart into this mini canvas album.  This mini is a celebration of breaking the silence.  I am thrilled that I had the opportunity to fuse my various forms of art together to make one cohesive piece.  In this post I will walk you through the aesthetics of the book as well as touch on some of the emotion through my images, my own words, quotes, and song lyrics.  Oh, one important note –you can see, feel, and hold this book at this year’s Great American Scrapbook Convention!  Just stop by the the Crafty Scrapper’s booth and they will point you in the right direction.  I hope this speaks to your heart… 

***CLICK IMAGES FOR LARGER VIEW****
Oh, and please excuse any typos and grammatical errors --I wrote a lot and don't use spellcheck.

This is the cover of the mini canvas book.  It’s actually a chipboard album covered in canvas and it’s made by Maya Road.  I stamped the foliage on the upper right hand corner using black archival ink.  The stamp is by Tim Holtz.  The rose flowers are by Prima but I’m not sure who the other flowers are by.  Sorry.  More detail about this cover in a bit. 

I also stamped the spine with a Tim Holtz stamp using black archival ink.  I then fastened these kraft hearts using a large pin and then tied the ribbon directly on the pin.  These ribbons will be changed out when the book arrives at the store.  I want them to be purple because that is the color of domestic and family violence awareness. 

And we’re back to the cover to look at this little trinket box.  This little box is by Maya Road and actually housed buttons when I purchased it but you can do all sorts of awesomeness with it.  I decided to make a little shadow box.  I first changed the color of the silver box to antique gold by using gold, latte, and butterscotch alcohol inks by Ranger.  I then cut a piece of scrapbook paper and journaled the words “Live to Tell”.  I then alcohol inked a little doll –this one by Tim Holtz.  I used gold and currant on the doll.  I then added a Prima rose and a Prima heart-shaped button.  Pretty neat, huh?  Come to think of it…I’m not sure that button is by Prima Marketing…but I’m about 80% sure that it is.  I’m not known for my attention to product detail.  I don’t know what’s hot and what’s not in scrapbooking –I just create! 

I love, love, love this heart!  I have used it several times in other art and I can’t get enough of it.  This is one of Tim’s first releases.  Oh heck, I will call him Tim if I want too –everyone knows who Tim is.  What better way to express a healing heart then stapling down the middle!  And this heart wouldn’t be complete without the purple ribbon for DV awareness.   

Yep, we’re still on the cover of this monster!  I wanted to highlight this handmade prize ribbon inspired embellishment that I made.  I used burlap trim by Maya Road, a wooden banner by Prima (I think), alphabet stickers by Creative Imaginations (I think), a journaling piece by Maya Road, and a flower by…well…it looks like Prima but I’m not certain.  Remember, hot glue is your friend…until you accidentally stick your finger in a glob of it and then the gloves come off!  Anyway, I glued the wooden banner to the burlap, put the stickers on the banner and distressed them with a sander, mounted the journaling piece at the top of the banner and then glued the flower over the journaling piece.  TA DA!  Okay, I promise…you can now see the inside of the book! 

First up is this beautiful chipboard frame which gives you an almost full view of the second image in my book.  This chipboard frame is by Maya Road (surprise, surprise).  I misted it with Dyan Reaveley’s Dylusions spray mist –whatever her purple color is called.  I then stamped some leaves on the edge also using Dyan’s stamps and bird is ALSO by Dyan.  I stamped that little fell on kraft paper, cut him out and then glued him to the corner of the frame.  Turn the page frame. 

“Here’s the weight of the world on my shoulders…” from the song “Fly from the Inside” by Shinedown...in the backround a self pic with a broken heart.  I added this image when I was completely done with the project because I did not like the chipboard showing in the background when looking at the album from this position.  On the right is the now second image of the book.  Yep, that’s Ms. Ruin –a domestic violence SURVIVOR.  “She’s picking ghostflowers from her soul” is from the song “Ghostflowers” by OTEP.  It reminds me that I can recover from the trauma but I’ll always have little remnants of the past inside of me.  You just don’t forget.  Ever. 
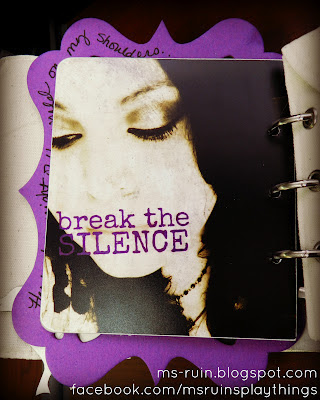
People wonder why I kept silent about my domestic abuse for so long.  I knew that they knew…so why didn’t I open my mouth?  I had shame that I had put myself in such a situation and I thought that at all costs I was going to turn it around.  Little did I know that my silence was killing my loved ones.  I will never forget the day my mom shared how upset and anxious my father would get when he would try calling me and I wouldn’t answer the phone.  Keep in mind, I was 20 hours from home.  She told me that he would say “For all we know, he’s gone off and killed her…”  That crushes me every time I think about it, just as it pierced my heart when I typed it for you to read.  :*( 

The cool thing about this little canvas book is that it also comes with two canvas pockets!  This is the first pocket.  I used some Dyan’s stamps and another journaling thingie by Maya Road with a picture of me strategically placed inside…so now it’s also a picture frame!  Brilliant, I know.  :p 

The chipboard and journaling thingy are by Maya Road.  I really need to quit calling it journaling thingy…I don’t know the official name…heck, I don’t even know if they are for journaling but that’s what I would use them for!  Again, I misted the chipboard using Dyan’s spray mist.  As for the quote on the right side of the book –well, it’s a fancy way of saying “everything happens for a reason”.  But I do like to think that everything I endured was purposeful…I can’t imagine my life without all of the events that brought me to this point in time.  The good, the bad, and the horrible. 

The words “Coming out of the dark” remind me of the days we spent on the road between Tennessee and Texas.  I sat in a U-Haul nestled between my mother and father who had come to rescue me and take me home.  I can remember being so happy…we laughed and sang and told jokes all the way home.  I don’t think I had smiled so much in a very long time.  I was slowly emerging and for the first time in a long time I didn’t have to pretend to be happy –I was TRULY happy.  I shared with my father that I loved that trip home and he told me that he enjoyed it too but didn’t really want to ever do it again.  ::big smile:: 


This is a large chipboard piece by Maya Road.  I put a couple of my pictures on it and then sanded the edges and also ran the sanding block all over the surface of the photos to give them a distressed look.  I then stamped the word journey using one of Dyan Reaveley’s stamps and then placed a raw piece of chipboard over it and outlined it with a black pen.  I finished off this piece by journaling a quote from the book “The Shack”.  I absolutely love this quote and it has resonated with me since the day I read it….”Pain has a way of clipping our wings and keeping us from being able to fly, and if left unresolved you can almost forget that you were ever created to fly in the first place.” 

On the backside I used Maya Road, Maya Road, and oh yeah, Maya Road.  I misted the chipboard piece with Dyan’s purple spray mist.  I then positioned chipboard letters spelling the word “NOTES”, essentially using them as stencils.  I then misted over the entire chipboard using Maya Mist –I think it might have been the Iridescent Pearl Mist but I’m not 100% certain.  Once it dried I outlined the letters and the chipboard with a black pen and then proceeded to do my journaling.  These are lyrics from the song “Fly from the Inside” by Shinedown.  Also, I wanted to mention that this didn’t photograph very well, but this piece is very sparkly and rich…very pretty. 

We have reached the other canvas pocket in this mini.  Let me say that I don’t know that I would ever speak to my ex-husband again…even if I had the opportunity.  He is now a perfect stranger to me.  But here is some insight to what I WOULD say to him if I just had too.  “Dear Abuser,  You left me shattered and broken.  You said I was unlovable.  Boy, were you wrong!  You will know me by the scars I bear…the only way I would ever allow you to know me again.  YOU are not worthy of my good life.”  Bravo to Dyan Reaveley for making that awesome stamp that says “I don’t like you.  You’re very ugly and have no manners at all.”  Perfection!  See that big burlap button at the top?  I made that.  I cut up a burlap sack and wrapped it around an oversized bingo chip and then added the white trim to it.  I like it.  I took advantage of the pocket and made a tag that can be pulled out.  These words were inspired by the song “You Love Me” by Kelly Clarkson.  The tag reads:  “You said I wasn’t good enough but what you really meant was you’re not good enough.”  You couldn’t deliver so you turned it around and opened my eyes while breaking my heart.”  ::EXHALE::  True story.  The tag was misted with Dyan’s purple spray mist.  The bird on the tag is also from Dyan’s stamp collection and the burlap is trim by Maya Road. 

On the back side of the second canvas pocket adhered brown roses that are actually really beautiful and frilly trim by Maya Road.  I then misted the Maya chipboard and glued it directly over the trim with picture intact.  The journaling is from the song “Fine Again” by Seether.  It reads “I am aware that everything is gonna be fine.” 

I love this sentiment…the thought that I’m perfect even with all of my flaws.  I wasn’t perfect for him, but I am perfect for so many other people in my life that can love me even with all of my imperfections and in fact, I am VERY okay with that. 

My book closes with this lyric by the beautiful Kelly Clarkson:  “In the end, the day I left was my beginning.”  Fortunately for me, I have been surrounded by so much love and support…I didn’t ever feel the need to be in his life again.  I am truly blessed. 

If you or someone you know are in an abusive relationship, please get help by calling the National Domestic Violence Hotline at 1-800-799-SAFE (7233).  Live to tell…Y

Tuesday, April 24, 2012

Send All My Love To You

My very awesome friend Dee Dee is hosting the April/May ATC Swap at Artsy Fartsy.  For this swap she gave us a photo prompt and we are to make three cards inspired by that photo.  I'm not going to post the picture, you can visit our Events Page for all of the swap details and hey, there's still time to join this swap! 


I decided to make three identical cards.  I think looking at the cards you can figure out the theme --handwriting a letter and sending your love to someone via mail.  See the post marks I stamped on the upper right hand corner? 

I think the pen nib ties this whole theme together.

I haven't been as crafty as I'd like to be but I have a whole weekend to myself coming up and I intend to craft, craft, craft!  I have backorders and I'm getting some very awesome new jewelry making material!  I CANNOT WAIT TO SHARE!  Hopefully it arrives in time for my weekend. 

I am also trying the technique of sealing an image with diamond glaze by pouring it into a bottle cap.  I poured about half an inch into each bottle cap and I KNOW that it's going to take at least a day to dry.  Ummm, yeah, I poured the glaze two hours ago and I have run in to my craft room FOUR times to check on the glaze --like it's magically going to dry in two hours???  Hey, at least I didn't stick my finger in it.  Well, not yet at least.  :D

That's all I've got for now.  I will leave you with this awesomeness.  BTW --LOVE, LOVE, LOVE her dress.  I have one that is semi-similar but not this cool or flattering for that matter.  "We'll call her Nebraska...Nebraska Jones..."  If this song doesn't make you move, check your pulse.

Sunday, March 11, 2012

More Design Team Projects & Special Offer

I FINALLY finished the last of my design team projects for The Crafty Scrapper on Friday night.  Yep, I'm that girl that is home on Friday night...scrapbooking.  Not that there is anything wrong with that.  But some people would be surprised by that.  lol.  Anyway...this first project is a 12x12 layout about my dog, Yeller Trouser.  She is quite the character!  This is BRAND NEW paper by October Afternoon from the 9to5 line.  The background paper is called "Girl Friday".


I LOVE this paper because as you know by now, I love old typewriters.  I cut all of these little keys out with scissors and the name of this paper is "Meeting Minutes" --how appropriate.  :) 


Okay - here's one more look at my little lovey...isn't she friggin' adorable?!?!  Wow, I need to lay off the energy drinks.  lol

----------------------------------------------------------


Everyone is going nuts over this Maya Road coin purse.  It's growing on me.  HA!  No, really, I recognize that it's beautiful but it's also very NOT ME.  However I think this will be a wonderful Mother's Day gift.  First of all, the coin purse is made of canvas (I cannot wait to make one for myself with embossed black birds!) so already it's awesomeness.  Lots of Maya Road and hardware by Tim Holtz.


My thought with this was to make a "Garden for Mother" --so on the inside I made this accordian style pull out with a bunch of my own garden/nature photography.  Genius, I know!  If you would like to make this same coin purse but don't have garden/nature shots, I will gift them to you in 2.5 x 2.5 (perfect size for the purse)...just shoot me an e-mail at msruintx@gmail.com and I will send them to you!