Ms. Ruin's Playthings


"The imagination imitates. It is the critical spirit that creates." -Oscar Wilde

Showing posts with label 7gypsies. Show all posts

Thursday, April 3, 2014

Altered Mason Jars

Hello bloggers and blog readers.  I've got a few projects I've worked on lately that I want to share with you but for today we'll zero in on a couple of gorgeous altered mason jars.

As you know, I run Artsy Fartsy, a swap community on Facebook, with the help of my friends DeeDee and Genie.  Each month we host a swap and for the month of March, DeeDee hosted an altered mason jar swap.  My partner told me she enjoyed vintage styling and she lives in Louisiana so a fleur-de-lis would be to her liking.  So with that little bit of insight I got to work.

Ms. Ruin's Supply List:
Basic Crafting Tools 
Alcohol Inks and a dauber
Paper Flowers
Embellishments
Twine
Tissue Paper


The first step I took to create this gorgeous project was that I applied a decorative oval shaped sticker to the jar.  This particular one is from Tim Holtz's Idea-Ology Industrious Stickers/Borders.

I then started inking the jar with alcohol inks on the outside only.  I used about three or four different colors, I believe they were ginger, butterscotch, raisin, and gold.  I applied one color at a time.  Keep in mind that you don't have to cover the entire jar with each color.  I however did cover most of the jar each time I applied an ink.  The key to getting that marbleized look is to simply tap the jar with the dauber repeatedly --kind of like using a sponge when sponge painting.  The gold ink was the only metallic I used.  I made sure to make it the last ink that I applied all over and then I went back over it here and there with other colors.  (Helpful tip:  Keep alcohol blending solution on hand just in case you don't like the way your project is looking, you can apply the blending solution and the inks will wipe right off. )

The ink dries very quickly so I was able to move on to the next step within seconds.  I wanted to bring out the details of the sticker a little so that they wouldn't get lost behind all of the inks I had just adhered so I took a sanding black and just scuffed it up a bit.  Since the sticker is paper, white was exposed.  I went back and dabbed alcohol inks over it.  You can also use distress inks for this.  

I took a handful of flowers from my flower stash and adhered those to the bottle with hot glue.  And trust me, those babies are not coming off of that jar without a fight.  I then applied the fleur-de-lis which is an embellishment I had in my collection for many years.  I used E6000 to adhere the embellishment.  One of the final steps was to wrap twine around the neck of the jar and then I tied down the key.  There is one final step which I will cover in a sec.


I actually had two jars on hand so I decided to decorate a second jar for a friend.  I used all of the same steps except that I stenciled the first letter of her name on the jar rather than using a fleur-de-lis embellishment.  When it was all said and done, I kind of wish I had also used an embellishment because she too is from Louisiana!  But I think it's just as pretty and personalized.  :)


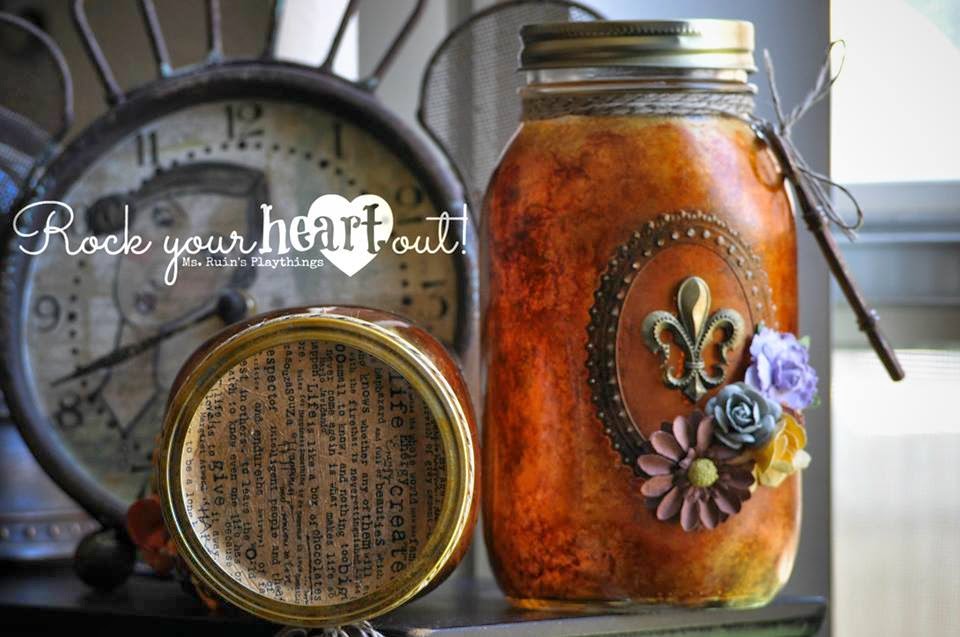
Alright, the final touch on these jars was adding this printed tissue paper to the lids.  Remember, mason jars have those little plates that come right off so what I did is I traced the circle onto printed tissue paper, this paper is by 7 Gypsies.  Then I applied glue and seal to the plate and adhered the tissue.  Once that was dry I put a coat of glue and seal over the tissue to protect it from tearing.  Ta-da!  Project complete.


What's next at Ms. Ruin's Playthings?  In my next post I'll be showing you these sweet little hoots that hatched in my craft room over the weekend.  Until next time...

Peace, love, and alcohol ink!


Sunday, February 19, 2012

Miniature Canvases

I honestly cannot remember if I posted these canvases or not.  My life is a complete whirlwind right now --I don't know if I'm coming or going and it's not even Monday yet!  ::exhale::  I've been taking a lot of deep breaths lately.  ::sigh::  Such is life, right?  A total adventure!

ANYWAY --here are some 2.5" x 2.5" miniature canvases that I made a few weekends ago.  I dig and hope you do too!  By the way, these are all available for purchase in my Etsy Shop.

Timeless --for a classy someone.  Canvas wrapped in tissue that is printed with inspirational free text and then painted with gold acrylic paint.  Silhouette of lady with pearls is chipboard by Maya Road and the word "Timeless" is a stamp.

Spark your creativity/imagination/ideas/etc!  Covered in tissue by 7gypsies, gears by 7g and Tim Holtz, alpha by October Afternoon and light bulb by Tim as well.  Tissue was also painted gold.  Oh, and the 7 is by The Girls Paperie.

Ideas in Motion --Also covered in 7gypsies tissue and painted gold.  Hardware by Tim Holtz and 7g.

Thanks for looking!


Sunday, January 29, 2012

Canvas love!

This is a six by six canvas that I made for MYSELF.  I rarey keep any of the things that I make.  This one is close to my heart because it's my daddy.  I used tissue paper by 7gypsies to cover the canvas and then mod podged to seal it.  Hardware and scroll by Tim Holtz, flowers by Prima.

This is 2.5 x 2.5 miniature canvas.  I covered it with 7gypsies tissue paper and then painted over the tissue with gold acrylic paint.  Hardware by Tim Holtz and letters by Making Memories.

This is also a miniature canvas --covered with 7gypsies tissue and painted with gold acrylic paint.  Chipboard by Maya Road.

I will have the miniature canvases for sale on my Etsy shop in the next day or two.  :)

Sunday, January 8, 2012

Lean on Me


A dear friend and coworker recently lost her husband and we wanted to give her a little something to remind her that she is not alone.  So I was commissioned to make a card for her but I wanted to go big because she really does mean a lot to me and she is so nurturning to me and to so many.  This will serve as a reminder that she has so many people to lean on during this difficult time.  

I am sooooooo proud of my tree branch.  Isn't it cool?  I can't draw to save my own life but I managed to draw this tree branch.  I drew all of the clouds too.  ::big cheesy smile::


These gorgeous birds are both chipboard by Maya Road.  I covered them with tissue paper by 7 Gypsies and then mod podged them to seal them. 


These chipboard letters are also by Maya Road...they are the Caroline font.  I painted them white and then adhered them to the canvas and then I mod podged over them. 


What we have here is CLOOOOOOOOUD LOVE!!  In fact, four different types of clouds.  These were so much fun to make and hey, I drew them all myself!  Yes, I'm proud of that.

Thanks for looking!

Tuesday, November 1, 2011

Don't Stop Believing


I made this canvas for a coworker who inspired me yesterday.  First of all, she also likes birds.  Secondly, she is going through a tough time.  Her husband has undergone a stem cell procedure as he has very aggressive cancer.  She has remained hopeful and has kept a smile on her face from the beginning.  I have to truly admire that.  “Belief is a beautiful armor; it makes for the heaviest swords…”


I first Mod Podged the white 8x10 canvas.  Then I applied tissue by 7gypsies.  I let it dry a bit and then applied Mod Podge over the tissue to seal it.  While that dried I embossed the word “Believe” on paper.  I cut the letters in strips to make them fit in the frame and also shortened the word to “Belief”.  Since the word was embossed, it was easy to convert one of the E’s to an F.  Other minor details include:
  • Stamp scrolls by Tim Holtz/Stampers Anonymous on the bird.
  • Outline the bird with a pen – I used a white gel pen.
  • Apply gold pain to chipboard crown – I used Maya Road Chipboard.
  • Dab black acrylic paint onto photo frame. 
 

Once the canvas dried I dabbed black acrylic paint to the edges and then smeared it around with my finger tips.


I adhered the key to the photo frame with a glue gun and also adhered the flowers (these are by Prima) to the frame with hot glue.


My last step was adhering the scrapbook paper with the word belief onto the canvas with glue and then I hot glued the frame over it so that the frame was glued directly onto the canvas.

Pretty simple, but very fab!


Sunday, June 19, 2011

Artist Trading Cards

We currently have two swaps going on at ARTSY FARTSY.  Remember, anyone can join - just need to have a facebook account.  One of the swaps is for recipe cards and is being facilitated by Genie Smith.  The other is an Artist Trading Card (ATC) swap that is being facilitated by yours truly.  We are each making a total of 3 cards which means we have three themes. 

The themes are:
  1. Childhood Memories
  2. A Favorite Song
  3. Surprise Theme (you pick a theme)

So far I have completed Childhood Memories and A Favorite Song.  Details below.  For those of you that are not familiar with ATCs – they are a tiny original piece of art created with the intention of swapping or trading it with another artist, not selling it. The one rule an artist trading card must adhere to is the size. An ATC should be 2.5 x 3.5 inches. ATCs can be made in any medium and using any technique, whether it's painting, drawing, or collage. You are really limited only by your imagination and materials."

This is what a card looks like when you purchase it – and heck, you don’t have to purchase these, you can simply use cardstock.  I buy the ones with the punches on the side so that I can put them on my Artist Trading Card carousel by 7gypsies.

Now…on with the magic.

ATC No. 1 of 3:  Childhood Memories


Who didn’t watch The Wizard of Oz as a kid?  Every time it comes on television I am mesmerized by the magic of oz.  It reminds me of the unique beauty in the Land of Oz and the journey of Dorothy and company along the yellow brick road.  I was able to capture the enchantment of Oz in this ATC with the help of Graphic 45 and their new line “The Magic of Oz”.  Scroll past the pictures to read steps/products.


Steps and Products for ATC No. 1:
  • Using a VersaMark Watermark Stamp Pad I juiced up the gorgeous vintage frame stamp by Glitz Design.  The stamp is from the “Fancy Frames” clear stamp collection.
  • Stamped image onto a large tag.
  • Covered with black embossing powder.
  • Embossed with heat gun.
  • “Generously” distressed with “Stormy Sky” distress ink by Tim Holtz.  When I say generously I mean I distressed the entire image – the embossing will serve as a “resist”, trust me, you don’t have to worry about getting ink on the embossed portion of the tag.
  • Cut image out with scissors.
  • Distressed a cream colored ATC with black archival ink (they also sell black ATCs).
  • Adhered frame to ATC with scrappy glue.
  • Using a glue gun, I adhered two layers of off-white colored lace to the center of the frame.
  • Adhered Dorothy image from “The Magic of Oz” paper by Graphic 45 to the lace (I did use hot glue on this as well)
  • “The Magic of Oz” title came from the cover of the paper pack (crafters don’t waste –hahaha!).  I cut it out and distressed the edges with a distressing tool and then inked it with "Vintage Photo" distress ink by Tim Holtz.
  • I don’t care for stickles but I did use red stickles on the hair bow and shoes because it’s the Wizard of Oz and hello – YOU NEED BLING!

ATC No. 2 of 3:  A Favorite Song


I am a music fanatic and listen to all sorts of music.  Some you would like, some would terrify you.  HAHAHA.  One of my favorite songs is “Perfectly Flawed” by OTEP.  This ATC is about empowering yourself when faced with adversity.  Scroll past pictures below to read steps/products.


Steps and Products:
  • Distressed ATC with “Fired Brick” distress ink by Tim Holtz.
  • Applied “Mod Podge” to the entire card and then placed an ATC transparency by 7gypsies over it.  Let it dry.
  • Applied “Zipper Trim” by Maya Road to the edge
  • Printed a picture of myself that I graphically distressed and added the words “Perfectly Flawed” to it.
  • Took a scrap piece of patterned paper and used it as a border for the picture.  Around the frame I hand wrote the following lyrics from the song:  “You’re perfectly flawed.  You’re perfectly incomplete.  A work in progress.  Imperfection makes you unique.”
  • Adhered the mat with the writing to the ATC using pop dots (I love dimension!)
  • Adhered picture of self to mat also using pop dots (more dimension – yay!!)
  • Using hot glue I adhered a red rose by Prima to the picture.

ATC No. 3 of 3 is yet to come…stay tuned.  And don’t forget to join us at Artsy Fartsy!

Sunday, April 3, 2011

New Playthings

Hello bloggers!  As you know, I have admitted to having a problem with buying scrapbooking/art supplies in the past.  I have really become better about it and only shop BIG a couple times a year.  In the interim I stock up on supplies such as adhesive and whatnot.  However, there is an exception my rule of big shopping only a few times a year and that exception is stamps!  I am quite the stamp freak.

Anyway, I did have a bit of a shopping spree in the last few days at The Crafty Scrapper.  Carolyn and company always stock the latest and greatest.  I will make another post of some of the new stuff in the store but for now, let me show you what floats my boat.

As most of you know, I LOVE TIM HOLTZ, anything Ranger, anything Stampers Anonymous, anything - well, you get the point!  So I definitely stocked up on the latest Tim toys.  :D
Love the pocket clock!

 STAMPS!!!!!!!!!!!!!!!!!!!!!!!!!

Woo hoo - new paper!

WOO HOO HOO HOO - NEW KRAFT PAPER!!!!!!!

Big fan of the lightbulbs! 

Another favorite of mine is 7gypsies.  I picked up a few of their stuff as well...


I love these bottles!  I don't know that I'll use them in my projects.  I bought them to display in my apothecary style studio.

One of my New Years resolutions was to be better about remembering birthdays and other special events.  So I finally broke down and bought this drawer.  My plan is to make cards ahead of time and then file them away until it is time to give to someone.  I am REALLY going to try to keep up with this.


Graphic 45 is probably my newest most favorite company.  They truly speak to my heart, just like Ranger and Stampers Anonymous.  Although I'm a little creeped out by clowns, I absolutely love their Le Cirque line.  Being afraid intrigues me.  I am a huge fan of vintage witches, so the witch on the broomstick is definitely my favorite graphic!  My intention is to make a mini album about our evening at the circus.  Intention --such a funny word!  Anyway, check out this awesome paper --front and back shown.


This is not from the Le Cirque line, but it is Graphic 45.  Cannot wait to use it!

I really try NOT to buy much scrapbook paper because I have TONS and I don't think I'll use it all in my lifetime.  But I do like to pick up random pieces that catch my eye.  Like these...


This one is by Webster's pages.  I tend to like just about anything vintage, especially if the theme is school houses or children.  I think I was born in the wrong era.  :)

This is probably one of the first times I have bought products by "The Girls' Paperie".  I didn't buy much, embellishments, some chipboard letters and acrylic stamps --oh, and I couldn't help myself to this paper - hello - birdcages!


And as if the Graphic 45 Le Cirque line wasn't enough, I couldn't help myself to these circus/carnival themed items by Glitz Design --these are from their Afternoon Muse line.  Sorry, I forgot to photograph the clear stamps so here is a graphic.


And now for the random portion of my post.  These are other little treasures I picked up...


Not sure who makes these beautiful wings --but you know me, I am a flight fanatic.

You can never have too many alphabets...these are by October Afternoon.

BIRDCAGES!!!!!  These are by Prima.

And finally...some goodies from Pinkpaislee.  These two packs are from the Daily Junque line.

PHEW!!!  Is your brain on overload?  My pocketbook sure is!  LOL.  Hope you enjoyed all of my new playthings. 

Peace, love, and playthings,


Ms. Ruin