Ms. Ruin's Playthings


"The imagination imitates. It is the critical spirit that creates." -Oscar Wilde

Showing posts with label maya road. Show all posts

Saturday, July 26, 2014

Altered Gift Bag

Hello friends --here are a couple of quick ideas to alter gift bags.  I went to the store and had a bag in hand and then I thought, "What am I doing?  I have all sorts of stuff at home to decorate a bag AND I have bags."  So this is what I made...


The bag in the back was stamped with a vintage baby buggy and then I adhered a flower to it.  The bag in the front took a little more work and a 3rd degree hot glue burn, it was worth it though!  I basically made a little chalkboard that they can remove and keep and then write their own messages.  Here are the steps for the second bag...

  • Paint a piece of chipboard (size of your choice) using at least two coats of Chalkboard Paint.  Allow chipboard to dry.  (Tip:  the chipboard will curl but when the paint dries all the way through, the chipboard will flatten).  If you don't have chipboard, try using a thin wooden board.
  • Adhere Maya Road Vintage Lace Tape around chalkboard.
  • Wrap hemp cord around chalkboard and secure in the back with a knot.  I also used hot glue to reinforce the position of the cord.
  • Glue chalkboard gift bag.
  • Embellish hemp cord.  I used Basic Grey, Maya Road, Recollections, Tim Holtz and Prima.

TA-DA!


The bags were a big hit and the best part is that my friend and her hubby now have a little chalkboard to use in their baby boy's nursery.

Until next time, peace, love, and extra special gift bags!


Thursday, July 3, 2014

Deserted Beauty

Hello  friends!  Thanks for stopping in to see my latest project.  This mini book is actually a design team project for The Crafty Scrapper.  When I first received it I wasn't exactly sure what I was going to do with it but at the last minute, it all just sort of came together.  Plus I had an opportunity to fuse my love of paper crafting with my love of urban and not so urban exploration.  You see, when I'm not painting chipboard I enjoy exploring abandoned places and capturing images to share with others.  Those of you who follow my photography are familiar with my motto, "I find beauty where most see atrophy."  I hope you are able to see the beauty too.


This lovely camera chipboard album is by the fine folks at Leaky Shed Studio and can be purchased at The Crafty Scrapper.  I also want to mention that all of the gorgeous paper I used in this album is from the "Accomplished" line of papers by Authentique.  You can find this paper right by the checkout!  A little bit about the cover which is typically the most embellished part of the book in my projects...I wanted to create a contrast between something beautiful and something, well, a bit on the mucky side because that's definitely what this book is about.  I chose a soft damask print for the background and then a bold brick print for the accent pieces of the camera.  All of the paper embellishments including the alphabet are by Tim Holtz and the flowers are by Prima.

Lets explore the inside of the book and don't forget that you can click on the images to view them larger.


This page holds a couple of pictures of an abandoned elementary school located in Premont, Texas.  I used a pocket from an old library book to hold my photos and a card that tells you a little bit about the photos.  


In case you're wondering how I got the pretty text on the Maya Road kraft tag, I simply printed the text on a regular sheet of paper, adhered the tag to the paper over the text, put the paper back in the printer and reprinted the text.  Be careful not to jam your printer!  If I had a typewriter, I would have used it instead. 


I really liked the way this turned out.  I'm not gonna lie, I was so frustrated with this page that I wanted to put the pictures sides by side, glue the Maya Road light bulb in the middle and call it a day.  But I walked away, got some sleep, and in the morning I churned this out with ease.  


The photo on the left flips open so that you can see the entire picture on the right and you can also read some details about these photos.  And just in case you can't see the print, these photos were taken in the ghost town of Medicine Mound, Texas which is located between Amarillo and Dallas.  We found the structural remains of a filling station and some really neat relics including the gas pump.  We continued down the road and drove through a field (remember, not so urban exploration) and found a very old grade school.  You can see that edifice on the cover of the book.  I don't think class will ever be in session again.  Or will it?


This old tractor was found next to an abandoned gymnasium in Shamrock, Oklahoma.  The town has few residents left and it appeared that the majority of the buildings were rundown.  I didn't do too much with this page other than cut along a couple of the clocks to tuck my photo into position.


I really like this page despite it's simplicity.  Sometimes when you have captivating photos, you don't want to clutter the page too much or you have one art form taking away from another.  I think a piece of burlap and hemp twine were just the right accents.  The Baker Hotel is located in Mineral Wells, Texas.  Is it haunted?  Likely.  But I'm drawn to it's towering beauty, sadly it lays in ruin.


On the flip side you'll find this image of an abandoned auditorium in Premont, Texas.  I am absolutely in love with this place but only have an opportunity to drive by it twice a year on my way home to South Texas.  And 9 times out of 10, my husband does not want to stop.  I don't know that I'll ever go back in there but I can tell you that I have been in there three times, alone, in the silence.  I have stood behind the curtains and peered out past the stage into an audience of empty seats.  Listen...you can almost hear them applauding.  


Who doesn't love old barns?  I know so many people that do!  How I wish I could have gotten closer to this old barn in Tennessee.  Again, the printed text on the kraft tag was made with my deskjet printer.  The pocket frame is by Tim Holtz and the Frozen Charlotte doll is by my friend artist AND author, Lisa Pace.


Does Tim Holtz have some of the best hardware or what?  I love all of these little trinkets.  This photo is really special to me.  I had seen this house so many times on I 35 North from Waco to Dallas.  One day, while traveling alone, I finally exited off the highway and spent a good 30 minutes studying a map and driving down side road looking for this house.  Well, I found it.  It was on a dirt road that had not been traveled in so long that the grass and brush had started growing over the road.  That's why I had difficulty finding the house!  But I found it --I traveled down the road with nothing and no one else in sight.  I reached the dead end and there I found this magnificent beauty.  I took my photos and then just stood there and wondered what her story was.  If those walls could talk, what story would they tell me?
  
For this last page, I used a really neat technique that you will want to try on your next project.  Hold off on the coffee, you're going to need a steady hand for this.  


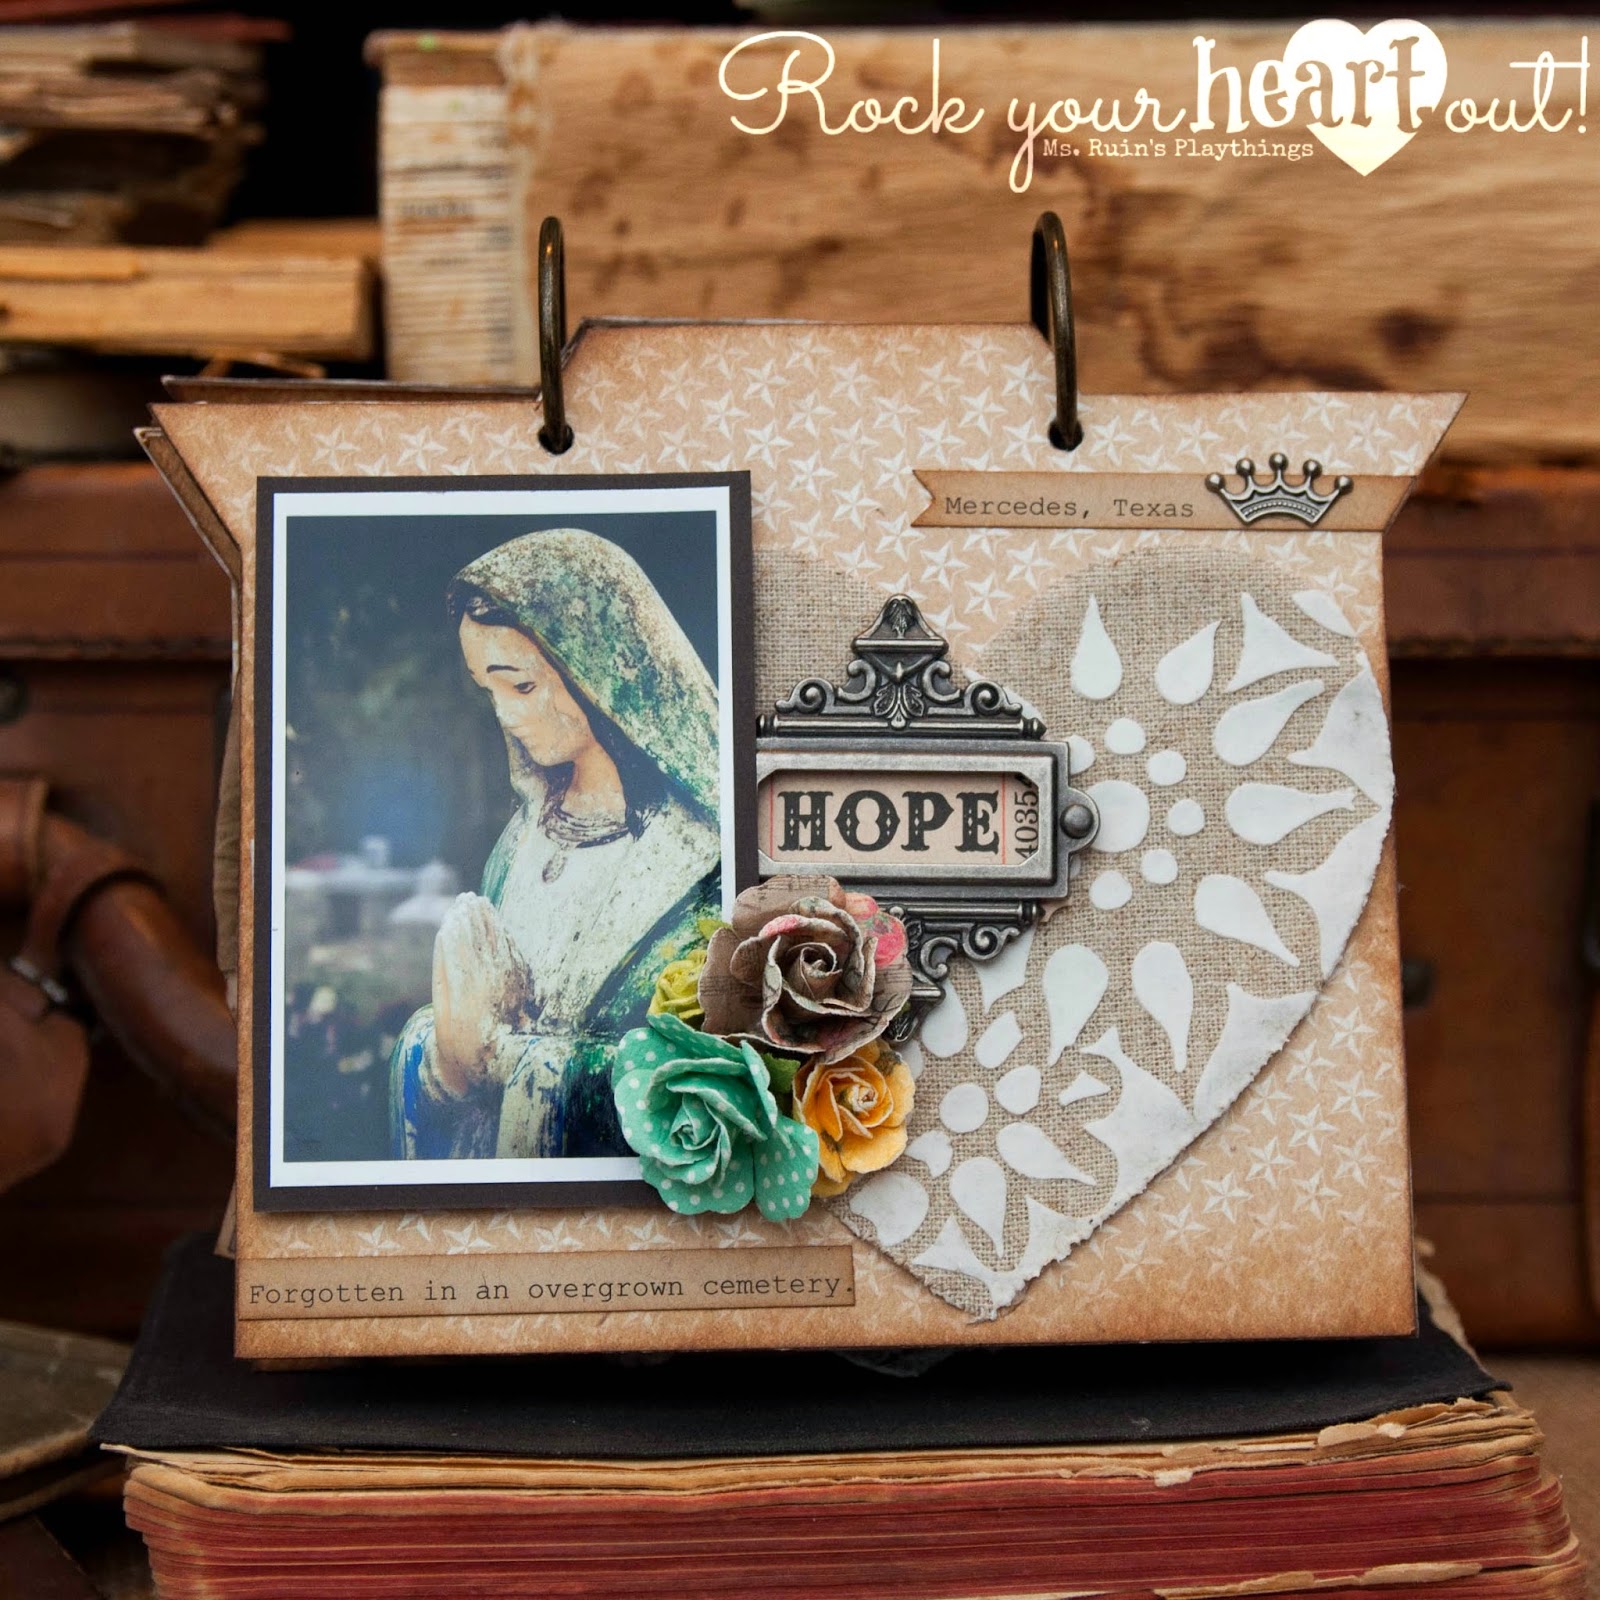
For this page I took a Maya Road linen heart and laid a stencil over it and then gently applied a thick coat of Wendy Vecchi's Embossing Paste in white.  I promise, once you do this you will want to do it over and over...just imagine the possibilities.  I also stenciled some beautiful black birds on other linen hearts for a different project.  About the photo:  The gorgeous statue on this page was found in an overgrown cemetery in South Texas.  I doubt that old place has many visitors, but I have a hunch that this statue restores hope for the disregarded.


I hope you enjoyed my book.  If you would like to see it up close, please stop by The Crafty Scrapper in Waxahachie, Texas and tell them you are there to see Sonia's latest book!  And don't forget that you can also follow my art and my photography on Facebook and on Pinterest (the links are on the right).  Until next time...take flight!

Ms. Ruin

Sunday, June 9, 2013

Happy June!

Hello bloggers!  I know that my posts are few and far between lately.  To say that my life has been a little bit of a whirlwind is an understatement.  I've been jet setting and just trying to keep a handle on everything that life throws my way.  Nothing too overwhelming, just crazy busy.  But honestly, I wouldn't know what to do with myself if my life didn't require a safety belt even when not driving.  

Although I have been doing a significant amount of shooting (for someone who doesn't advertise), I decided that it's time to refocus my time on my art.  At least for the summer.  I miss it.  It's just that simple.  It's tough when you have two things that you are very passionate about --for me it's my art and my photography.  I haven't mastered juggling both successfully.  One of them always ends up overwhelming me and not in a good way.  Do you juggle too?  How do you do it?

Anyway, in an effort to kick start my creativity in mixed media I decided to host a tag swap for the month of June at Artsy Fartsy.  Yeah, I said June.  I can't believe we're almost half way through the year of 2013.  But anyway --back to me kick starting my creativity.  Uhhhhhhh...::crickets::  So it didn't jump start quite as quickly as I thought it would but nevertheless I got some tags done.  Woot, woot!  And that's a lot to be happy about.  So let me show you what I made this morning...

Remember you can click on the images to view them larger.

I just love this little guy --he is so cryptic and mystical and well, there's just a whole lot going on with this little fella.  But I can't help but feel sadness when I see him.  The technical stuff:  Mustard Seed Distress Ink all over tag then I cut out a mask of the little guy and positioned it where I was going to stamp him.  Then I covered the entire tag with Peeled Paint Distress Ink.  I stamped the vines from the Dylusions line and then I removed the mask and stamped my little Creep.  Yep, this one inspired by Radiohead's "Creep".  I also shaded the edge of the tag using Vintage Photo Distress Ink.

I made three pretty identical tags for my swap --they all basically look like this one.  I first covered the entire tag with Peacock Feather Distress Ink and then shaded the edges of the tag with Vintage Photo Distress Ink.  I wish I could remember who makes the stamp I used for this tag but I don't have that in front of me so I will update it when I have an opportunity.  The hardware is from the Ideaology line and the "journey in time" stamps are from Maya Road's art journaling stamp set.

I love, love, love, love, LOVE the gold stars!  The stars are courtesy of a new stencil by Heidi Swapp.  I positioned the stencil on the tag and then covered the stencil with gold embossing paste by the fabulous Wendy Vecchi.  I actually took one of Wendy's classes last weekend!  But more about that later.  Anyway, I think these stars are the bees knees.  ::big smile::  The final step in these tags was misting perfect pearls innnnnnnn...oh crap, I don't remember the color.  I want to say Sunflower Sparkle but I think that may be incorrect.  Again, will get back to everyone on this.  But I do want to say that the mist and stars added a whole lot of magic to these tags!

This one is oh so pretty --I used my favorite distress ink color, Mustard Seed.  I shaded the edges using Vintage Photo Distress Ink and all other steps mimic the ones already mentioned above.  Pretty neat, eh?

As I mentioned a second ago, I had an opportunity to take a class with the fabulous Wendy Vecchi.  It was a technique class and I'll admit that I knew 75% of what she taught that day but the class was still interesting and I walked away with a bunch of tips and some new techniques.

Alright, I will do my best to not be a stranger.  I will post photos soon from some of my recent shoots and adventures.  Until then...peace, love, and never truly losing your creative spirit.  :)


Sunday, February 17, 2013

Linen Love


Stay tuned!  I will be posting about this lovely piece tomorrow.  It's a BRAND NEW linen album by the folks at Maya Road!  Just look at all of the delicious details!!!  

Sunday, February 10, 2013

Say Cheese!

Hello bloggers!  As most of you know, I love-love-love to take photos!  So when I saw all of the new neat camera related papers and embellishments and chipboard out there I was beyond stoked.  Fortunately for me, the ladies at The Crafty Scrapper hooked me up with brand new Bo Bunny Mama-Razzi 2 papers  and brand new Maya Road!  This album was beyond fun to put together...I hope you love it too!

I don't often get to make mini books about my trips so I thought I'd take advantage of this opportunity.  Last year I went on several trips including a very dreary trip to New Orleans.  It rained THE ENTIRE TIME we were there.  :(  But I still managed to get out and about and snap a few photos.  Although I didn't get to some of the places I really wanted to revisit or visit for the first time, I think I still managed to capture the Spirit of the Big Easy with the time that Mother Nature allowed.  The first thing I did was pick out all of the photos that I might possibly use.  The next step was converting them to square images and adding a Polaroid border.  Since the Maya Road Say Cheese Camera Album looks like a vintage Polaroid style camera, I thought it would be fitting.  Although I scaled the images down so that they were not full size or Polaroid size photos, they were still super cute and functional for this "mini".  Once I had the photos reformatted and printed, I was ready to get started!

But wait!  Before I get into the nitty gritty, I really want to showcase the following papers from Bo Bunny's Mama-Razzi 2 line because they really made the project come together beautifully and if I had not bought these, I think my project could have had the potential to fall flat.


From left to right we have the Mama-Razzi 2 Stickers, Contrast, and Darkroom.  I used A LOT of these stickers to make my own embellishments and I used the papers to make pockets and overlays on just about every single page.  Okay, NOW we can truly get started...


***DON'T FORGET THAT YOU CAN CLICK ON EACH IMAGE TO ENLARGE IT!***


 This is the cover of the mini.  As I mentioned before --the chipboard album is by Maya Road and it is the "Say Cheese Camera Album".  The entire book is covered with Bo Bunny paper from the Mama-Razzi 2 line and all of the edges were inked up with Vintage Photo Distress Ink by Ranger.  The paper speaks for itself, it's beautiful.  The only thing I added to this paper was the stamped image on the upper right side of cover (around the flash).  That stamp is by Bo Bunny, also from this line.  The tin in the center is by Maya Road and I added a sticker from the sticker sheet I shared above.  Kudos to The Crafty Scrapper Manager, Gena Glover, for giving me that idea.  The image in the tin is a piece of film that makes a heart --clever!  I did cover the flash with Mustard Seed Distress Ink and then lathered it with Distress Crackle Rock Candy.  The green film strip is also a sticker from the Mama-Razzi 2 line.  I adhered it to a piece of cardstock and then glued it right onto the cover.  As for the cover photo, I wedged it into the cover to make it look like a Polaroid camera releasing a photo.  You can see closeups in the images below.


I'm not going to show you every single page I think this book makes anywhere from 10-12 pages (I don't remember).  I do however want to highlight the stamps that I used on this particular page.  These stamps are by Maya Road from the Picture Perfect stamp set and the Perfect Shot Arrows stamp set.  Now remember I said I used a lot of elements from the Bo Bunny Darkroom and Contrast papers?  Well, I cut out these films strips from the Darkroom paper and then put my photos in the boxes.  The strip that is shown in this photo had three boxes--I put photos in the top two and then folded the bottom one to use it on the next page...you will spot it in the following photos.  ;)


I love this page.  It has a lot of attitude and all around "fun" to it.  Again, I used an image from the Darkroom page and I was careful and cut around the miniature Polaroid which I stamped the letter "d" on.  This allowed me to stick a photo behind it.  You will see this technique throughout the entire project.  The "Oh Snap!" is from Bo Bunny's Mama-Razzi 2 stamp set.


One of my favorite elements from this page is the wooden Polaroid frame which is from the "You've Been Framed" by Maya Road.  I stamped the words "Say Cheese" from the "Picture Perfect Cameras" stamp set by Maya Road and I stamped that on the film strip frame that I folded over from the previous page.


This page has a lot of charm too.  The cork board tag is by Little Yellow Bicycle.  Okay, how cute is that chipboard camera?!?!?!?  It's so cute it's downright ridiculous!  That's also by Maya Road from the "Say Cheese" collection. 


Again, I cut out images from the Darkroom paper and cut around the cameras to make a pocket that holds about 5-6 mini Polaroids.  This will allow onlookers to pull the photos right out and look through them.  Then they can simply tuck them back into place.  Mini pockets rock!!!  Okay, that was super nerdy, wasn't it?


Yet another pocket made to share several photos per page.  This pocket was made possible by the Contrast paper.


And another pocket!  This particular pocket was made using the Contrast paper as well.  I simply cut a slit along the top portion of the banner and was careful not to put glue on it when adhering it to the paper.  Instant pocket!


Same technique with this pocket.  This particular pocket was made using an image from Darkroom paper.  The stamped filmstrips are from the Mama-Razzi 2 stamp set.

FIN!

I hope you enjoyed my project as much as I enjoyed bring it all together.  Now go out and get this paper and all of the products I used because they're waiting for you at The Crafty Scrapper!  

Peace, love, and camera stuff...

Ms. Ruin

Monday, January 28, 2013

Uncaged


My very latest "completed" Design Team Project is a decorated Maya Road linen heart.  We were each asked to embellish the heart with our own "style".  The goal is to describe who we are and what we like to use in our day to day projects.  Of course this was a no-brainer for me.  I used some of my all time favorite products from Maya Road, Tim Holtz, Ranger, and Prima (product list at end of post).  But we'll get into that in just a sec.

So why "Uncaged"?  Well, it's simple.  I have always been a creative person.  I can thank my very talented mother for this.  She can draw.  I cannot.  But I did inherit other artistic traits from her.  Thanks, mamacita!  Back to "uncaged"...well, as most of you know I was in a marriage many years ago that was riddled with domestic abuse.  I was not allowed to create anything, to keep journals, to write poetry...nothing.  This is devastating to someone like me who needs to express herself with words, with art!  I can remember keeping a spiral notebook hidden in the back panel of my nightstand.  On the nights that were the most traumatic, I would pull it out after he was asleep and I would write in it...in the dark.  I couldn't see lines, but so long as I could feel the paper, well, that was enough for me.  That notebook was my only friend for several years.  When I visited the notebook, I was free!  But any other time, I was a prisoner.  ::exhale::  But that is over now!  And guess what?  I can create whatever the heck I want too!  Try and stop me.  I use a lot of birds in my work because I wanted so badly to be like a bird.  I wanted the courage to fly away, to escape, to break the confines of my cage.  Although that time of my life is now over, I still can't fly.  Well, at least not physically.  But every other part of me has the freedom to soar!  

"Most birds were created to fly.  Being grounded for them is a limitation within their ability to fly, not the other way around.  You were created to be loved.  So for you to live as if you were unloved is a limitation, not the other way around.  Living unloved is like clipping a bird's wings and removing its ability to fly.  A bird is defined not by being grounded but by his ability to fly.  Remember this, humans are defined not by their limitations, but by the intentions I have for them; not by what they seem to be, but by everything it means to be created in my image.  Love is not the limitation; love is the flying.  I am love."  -William P. Young, The Shack

Alright --are you ready to see the entire project?!  Here we goooooooo...


Lets work from the bottom up...this wooden cage is by Maya Road.  I dabbed it with gold adirondack paint by Ranger.  Then I journaled the word "uncaged" on a piece of scrapbook paper and adhered it to the cage.  I decided to add a pink flower to soften the idea.  The wing is also by Maya Road and it is actually acrylic!  I lathered one side of the wing with glossy accents, also by Ranger, and then adhered it directly onto vintage music paper.  Once it was dry I simply tore away the excess paper.  This was easy to do as the paper was very old and brittle.  If you are using newer paper you may need to use scissors.  


I have been playing with polymer clay lately.  I'm new to the clay world but I can only imagine possibilities!  I was looking for a bird mold but didn't have any luck in that department.  But hey, craft people are resourceful so instead I pressed a Maya Road wooden bird into to the clay and used it as a stencil.  I popped him in the oven for 15 minutes --I guess you can say I had a bird in the oven.  ;)  Anyway, once he was cooled off I dabbed him with various alcohol inks.  I don't recall which ones I used, I tried about 4 different shades and finally got this pretty iridescent look.  I definitely used Raisin and Gold but after that I don't recall.  If you decide to use alcohol ink on clay and you don't have an extra piece of clay but don't want to commit to a color --ink the backside of your project for testing purposes.  ;)  My last steps were stamping the word "soar" and outlining my little fella with a black pen.  Oh!  Quick note about the "soar" stamp.  That word, plus the ones I used on the heart are from a new art journaling stamp set by Maya Road.  GET.THESE.STAMPS.  I promise, you will love them and you will use them often.     


Another medium I LOVE to use is cardboard.  And it's free!  In this piece I cut out a heart from corrugated cardboard and then painted here and there with Mahogony Crackle Paint by Ranger.  The keyhole is from the Idea-ology line by Tim Holtz.  I also used alcohol inks on it.  The crown is chipboard by Maya Road, painted with Gold Adirondack Paint by Ranger.

So there you have it!  I hope you enjoyed my project.  I am shipping it off to The Crafty Scrapper today.  I almost can't wait to get it back so that I can hang it in my studio.  In my next blog post owl feature a couple of fellas that are quite the hoot!  You'll have to come back and meet my new friends.  ;)  I will leave you now with the product list for this project.  Peace, love, and taking flight!

Product List (Click image at beginning of post to see large view of most products used):
  • Maya Road Linen Heart
  • Prima Paper Flowers (the best!!!)
  • Maya Road Wooden Bird
  • Black Sculpey Polymer Clay
  • Maya Road Chipboard Crown
  • Maya Road Art Journaling Stamp Set (LOVE!!!!)
  • Ranger Distress Crackle Paint
  • Maya Road Acrylic Wing
  • Maya Road Wooden Birdcage 
  • Tim Holtz Idea-ology Keyhole
  • Ranger Adirondack Alcohol Inks
  • Ranger Adirondack Acrylic Paint Dabber in Gold
  • Vintage Piano Music Sheets

Sunday, December 23, 2012

Gender Reveal

IT'S A GIRL! 
 
 
We are ecstatic at the arrival of my friend's very first grandchild and it's a girl!  Ohhh, the things we will buy and make and the ways we will spoil her!  I don't know if I'll ever know the joy of motherhood and that makes me beyond sad.  But I'm also blessed to have people in my life that will let me share in the joy of raising a child...and then I can gladly hand the child back to them when they start whining and kicking.  Ugh.  Don't get me started on that one.  Anyway, for now --we celebrate! 
 
 
I just love, love, love, love, LOVE that wooden bunny by Maya Road.  :D  The flowers are really beautiful and nice to the touch.  Those are by The Paper Studio.
 
Thanks for looking!
 
Peace, love, and baby girls.


Sunday, July 29, 2012

Art...my saving grace!

I am beyond thrilled at the way in which this canvas came together.  So many layers, textures, mediums, fun, fun, fun!  Used in this project were acrylic stamps, cling mount stamps, old dictionary pages, stencils, white and black gesso, ink sprays, adirondack paints, chipboard...lots of goodness.  I won't go into full details because my brain is on overload and my eyelids are about to defeat me.  Let's just say that all of the little secrets are in the details...just look closely!


Family Matters

As I mentioned earlier, I was away on a retreat with some friends this weekend so I managed to get a lot accomplished.  I completed three projects for family and about family.  First of all --the Circus is coming to town and how I wish I could take my niece and nephews with me when I'm sitting front row at American Airlines cheering like a fool.  LOL.  But in the spirit of the Circus --oh, and not just any circus...I'm talking Barnum and Bailey, baby...anyway, in the spirit of the Circus or Le Cirque, I am sending both my nephews and my niece some fun and flavored popcorn that is adorned with a circus themed tag.  Something tells me they are going to care more about the popcorn.  :p
I also made a 5x7 book FOR ME.  Yes, FOR ME.  You see, I rarely keep things I make but gosh darnit, I'm going to keep this one for myself.  This book is filled with beautiful 5x7 portraits of my family from start to end.  The only embellishing I did was to the cover.  I covered it with 7G tissue paper and made one of my famous clusters using flowers and elements from Maya Road, Prima, and Recollections.  I am so pleased with how this turned out. 

The other project that I made is a 5x7 album as well but this one is about my nephew playing T-Ball.  Again, not much embellishing and the paper that I did use was from a cheesey kit.  But that's okay...it's not the paper or the embellishments that made this book and told the story...it was the pictures inside.


Thanks for reading!