Ms. Ruin's Playthings


"The imagination imitates. It is the critical spirit that creates." -Oscar Wilde

Friday, April 29, 2011

More Urban Decay

On my drive to Oklahoma last week I came across this lovely building in the middle of Gainesville, Texas.  I was first distracted by the sign for a pie company on the square so I exited.  But then I saw this beauty and decided "Who needs pie, when I can spend time photographing this!"  I spoke to the owner who said he didn't currently have any plans to restore the building --what a shame.  I would turn this building into studio apartments for artists.  :)  But that's just me.  I didn't ask what this was in the past but it had to be some sort of processing plant because they had old elevator mills built in the mid to late 1920's.  My fascination with these buildings is the mysteries that lay silent in the walls --waiting for someone to unearth the secrets.


Here is another picture that I took at Logan County Memorial Hospital in Guthrie, Oklahoma.  I'm digging this angle.

Wednesday, April 27, 2011

Guthrie, Oklahoma

As I mentioned in an earlier post, I spent the weekend in Oklahoma with friends.  They live in Cushing.  On Saturday we took a drive to Guthrie which is about a half our drive from Cushing.  Guthrie has so much charm.  I loved all of the old buildings and the antique shops were so much fun.  Here is imagery for you to enjoy. 


This was the very first State Capital of Oklahoma.  The Capital now resides in Oklahoma City. 


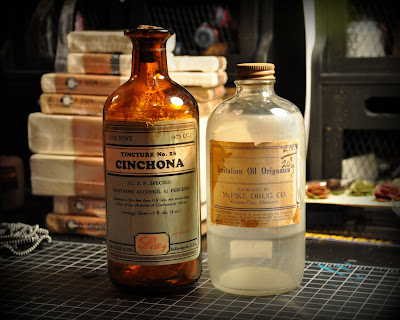
I took this picture in an antique store.  I love old medicine bottles and I love antique stores.  They inspire my creativity.  :)

I thought this was super adorable.  This cat was sleeping on this chair that is part of a storefront display.  Yes, he is real.  When we walked back by he was laying in a different position.  Meow!

Thanks so much for looking!

Tuesday, April 26, 2011

New Goodies

While I was in Oklahoma, I hit up Wisteria Antique Mall.  I couldn't help myself to some medicine bottles.  I love having them in my studio because they inspire my creativity. 

I also purchsed these old desk drawers.  They will also go in my studio.


As for this...well, no antiques here really.  But I am a huge fan of Sweet Tarts so I basically bought all of the Sweet Tart Gummie Bunnies, Sweet Tart Bunnies & Duckies, and Sweet Tart Jelly Beans from my local Walgreens.  Ummmm, yeah.  I will share with those that visit my studio.  :D


Weekend Photography

I spent this past weekend in Cushing, OK and had the opportunity to visit a couple of abandoned schools, plus an abandoned hospital in Guthrie, OK as well.  I was in absolute heaven!  I am still sorting through and editing images but here are a few I would like to share with you.  The first two were taken at Logan County Memorial Hospital.

The Hospital was built in the 20's and closed it doors in 1977-78.  To read more of the history of this hospital, please visit THIS PAGE on abandoned ok dot com.     


The following pictures were taken at Norforlk School in Cushing, OK.  This school was also built in the 20's and closed its doors in the late 50's.  To read up on the history of this school, please visit THIS PAGE at abandoned ok dot com.


Monday, April 25, 2011

Fearless


Each Design Team Member was given a few items and asked to create something that defines their "style".  I decided to incorporate vintage elements because as you know by now, it's my thing.  My theme is Fearless.  I think even when I am fearful; I have to show the world that deep within myself I can muster up courage to propel myself forward.  When the going gets tough, I may cower down for a second but before you know it I am back up on my two feet and kicking some serious ass.  :)  So this is a tribute to my style and my attitude.

A little bit about this piece...I love old books.  Not so much to read them but I love to incorporate them into my work.  So I pulled the cover off of an old geography book from the early 1900's to use as a base for my work.


I purchased this little frame for a dollar at Michael's a while back.  I love vintage looking frames.  I just peeled off the back side and adhered it to the book cover with hot glue.  The paper inside of the frame is from the new kraft paper line by Tim Holtz.  The stamp is also Tim's --it reads "What if your FEARS and DREAMS exist in the same place, would you still go there?  The dangling chandelier piece (can't be seen below but can be seen above) is brand new from Maya Road.


The chipboard scroll is by Maya Road.  Like any other chipboard it is sold bare.  I dabbed "Vintage Photo" distress ink by Ranger/Tim Holtz.  Then I outlined the scroll using a black pen.  The cream colored calendar sheer is by Maya Road and it's one of the elements that was sent to me by the store.  The word "FEARLESS" was made with stickers by October Afternoon.  The black bird is a stamp by Tim Holtz/Stampers Anonymous.  I first stamped the bird on the sheer using "Staz-On" in black.  Then I stamped the same image on kraft paper.  I cut the image out and positioned a pop-dot behind it and then adhered it over the samped image.  I did not bother to cut the legs out of the image on the kraft paper --that's too much detailed work.  That's why I first stamped it on the sheer.  Make sense?  The photo is on a mat that I made using Kraft paper as well.   


For those of you that have never worked with chipboard, it looks like this:


You can dress it up in so many ways...with paint, paper, mists, inks, etc.  What I did with the chipboard flower shown here is 1) Inked it up with Vintage Photo Distress Ink, 2) I stamped over it, and 3) I embossed it with clear Ultra Thick Embossing powder (UTE).  Doing that will make your embellishment look like a neat epoxy sticker.  :)  As far as the flower on top of the chipboard - I think it's probably by Prima.  Again, I dabbed Vintage Photo Distress Ink then I filled the center with Glossy Accents and then dropped the mini ---hmmm, whatever those are in the center.


As far as the little goodies here...well, the calendar, license plates, and numbers are by Tim Holtz.  The buttons are chipboard and those are by Graphic 45.  The trinket star is by Maya Road.  And the flowers are by Prima.  Notice that I used the same technique on the smaller chipboard flower that I used on the larger chipboard flower (distress ink, stamp, and emboss with UTE).  A little bit about the significance of some of these items.  First of all I was born on Wednesday, January 26 1977 (hence the two 7's).  The word "Yes!" is the answer to the question in the frame.  The Texas plate is self explanatory, I'm a Texas Girl!  Texas born, Texas Raised, Texas Proud, Texas till I die!  The Tennessee plate is a testament to so much of who I am today.  I moved to TN years ago --away from my family to a place I had never been, where I knew no one but my ex-husband.  Was I scared?  Yes.  But I did it anyway with all of the confidence that I had in me.  I endured two years of hell away from my family being married to an abusive man but as I walked away from TN, I was braver than I had ever been. 


Thanks for looking, my friends. 

My Little Beach Book

This is another project I made for The Crafty Scrapper.  It's a mini chipboard album about a day on the beach.  At the bottom of this post, I have included the images I captured on a cold Winter day on the beach.  Bundle up and walk on the sand with me...


I have a seashell somewhere and once I find it I will put it in the little envelope.  :)


-----PHOTOGRAPHS-----


Zipper Rose Tutorial

To make a rose with Maya Road’s awesome new zippers I used a 1.5” in diameter round piece of chipboard, approximately 2.5 ft of zipper, and a glue gun.  If your zipper is not 2.5 ft in length, don't sweat it...you can use several pieces.  Just imagine, you can make a multi-colored zipper flower!  ::giddy::  Also, you may use a different form of adhesive – I first tried fabric glue however I am very impatient so hot glue is the way to go for me.


I start the rose by gluing the zipper straight across the edge of the chipboard. 


I then apply a dot of hot glue (see indicator) and pinch the zipper back.  This will cause the zipper to curve.  Do not be afraid to be aggressive with your zipper.  In fact, you have to be sometimes. 


Continue to do this in sections until you have gone all the way around the outer edge of the chipboard.  With this piece of 1.5” chipboard, I was able to wrap the zipper around it 5 times (5 sections) as seen below.


Now it’s time to start working your way inward.  Again, don’t fear the zipper – you will have to be a bit aggressive.  Also, be a bit more liberal with the glue as you move inward because your space is getting tighter and you want your flower to hold.  Once I get to row two I apply the hot glue directly to the chipboard. 


Since you are working with excess hot glue and you need to move quickly, use a pencil or a stick or some other tool that you can apply pressure with.  This will push the glue into the fibers of the zipper and hold it in place.


Continue to work your way to the center as seen here:


Once you get to the very end, trim the excess zipper if still very long.  Make sure you leave enough zipper to finish the flower  Apply hot glue to the center of the flower and then tuck the end of exposed zipper as seen here to the center of your flower.


Apply to craft project and admire!