Ms. Ruin's Playthings


"The imagination imitates. It is the critical spirit that creates." -Oscar Wilde

Tuesday, August 13, 2019

Vintage Carnival Book


Hello friends!  Today I'll be showing you a lovely vintage circus themed book that was a class at a local art studio.  The minute I saw this book I thought "I HAVE TO DO IT!"  I had been saving some special circus pieces and I still had photos from 2010 when I went to Barnum & Bailey. 

In the class we did the following:
  • distressed pages using coffee infused water to age the paper
  • distressed pages using Tattered Angels Mists and Ranger Distress Sprays in various colors
  • cut out vintage circus photos and ephemera to use in the book
  • cut out tags to decorate
  • assembled the monstrous book


These are the tags we made for the book --each one is unique, no two alike in the entire class.  I'm basically a "give me the tools and get out of my way" kinda girl.


I referred to the book as monstrous, but I'm not joking!  There's 50+ pages in this book!  Although we were given ephemera, stock photos, and I had a small collection of my own items to use, it just wasn't enough for this huge book.  I opted to purchase digital vintage circus backgrounds and other ephemera from Etsy --at very reasonable prices too.  When you purchase digital downloads, you instantly receive the files.  I was then able to resize them and print them for my book.  Once you download the files, they are yours and you can print as many copies as you need.

Rather than post a photo of each page, I made a video to show you the completed book.  I hope you love it as much as I do.  Thanks for stopping in...take flight! 


xoxo

Ms. Ruin


Wednesday, June 12, 2019

Rust Paste Set


Happy 2019!  It's been a minute but I feel like I'm finally getting my craft mojo back.  I've been working on a lot of mixed media projects lately and rather than shove them all into one post, I thought I'd section them off into some sort of categories.

In this post I'll be showcasing several wood pieces just like this one:


I start with a clean slate - plain wood with no paint.  I happened to find a bunch of these little birds on clearance at one the big box arts and crafts stores and I couldn't pass up the opportunity because I saw this vision in my head.

My next step is to choose the embellishments.  I have to add that I've really gotten into making my own embellishments using air drying clay and decor moulds by Iron Orchid Design.  So in theses projects I used clay molds, wooden embellishments, metal embellishments paper flowers, old pieces of jewelry and even words made of wood.  I position the embellishments where I want them on my project and then adhere them to the wood using either hot glue (if I'm in a hurry) or Prima Marketing Finnabair Art Basics Super Heavy Gel.  Once the embellishments have bonded with the wood, I proceed to painting!

TIP:  Prime your project before painting using gesso, it will make the painting process much easier and your project will look flawless.  I used Prima Marketing Art Basics Heavy Gesso in black.

Ready for some magic?  For the projects I'm sharing today, I used a three step painting process using these babies right here:


This is the Art Extravagance Rust Paste Set by Prima Marketing for Finnabair.  From left to right we have Red Rust, Gold Rust, and Brown Rust.  This paint is made for creating rusty textures and really adds dimension to your project so it's not a flat paint by any means.  My first step in the painting process is to paint my project all over with the Brown Rust Paste.  When I say all over, I mean ALL OVER, don't forget about the nooks and crannies!  I did not let my Brown Rust Paste dry completely before I moved on to the next step.

In step 2 I started adding in the Red Rust PasteI did not paint over the Brown Rust Paste completely.  Instead I just blended the Red Rust Paste in here and there.  TIP:  Don't be afraid to spritz water on your project to help with blending.

In step 3 I used the Gold Rust Paste to highlight my textures.  I used a brush on some of my projects and on others I used my finger.  There is no wrong way.  Again, step 3 is for highligting so I just hit the tops of the embellishments and the edges of my projects.  TIP:  There is no wrong way to apply these pastes, if you think you added too much of one color, let the paint semi-dry and then add a different colored paste.  Let your fingers do the walkin'.   

Once the paint was completely dry, I added the final touch of magic by applying Finnabair Art Alchemy Antique Brilliance Wax in various shades.  The wax consists of beeswax-based paste and has a permanent finish.  It will give your projects stunning color!  TIP:  Cover a project with black gesso, let dry, add various brilliance wax colors for a dramatic finish.  To learn more about Antique Brilliance Wax, check out this tutorial.

So there you have it, a quick blueprint of how I made all of these gorgeous projects below.  Please feel free to drop me a line if you have any questions.  In my next blog post we'll explore the Art Extravagance Patina Set.


That's all I've got for now.  Thanks for stopping in.  Until next time...take flight!

xoxo
Ms. Ruin


Wednesday, May 6, 2015

2015


Hello bloggers!  It's been a long, long, long while.  I haven't done much crafting lately but I'm in a new place now and have created a craft studio for myself that I hope will ignite my creativity.  I will blog about that space when I take some decent pictures.  You can see a sneak peek above.  :)

It's Spring so I'll be out and about taking photos.  I did spend some time at the Fort Worth Stockyards a couple of weeks ago with this young man for his senior portraits.  I love one on one sessions.  I think that is where I truly thrive when it comes to photographing humans.  


Mother's Day is in a few days and I decided on Saturday afternoon that I was going to create a mini album for my mom.  I work best under pressure.  The book is very, very basic and I'm not crazy about the paper line but it was free and honestly, the book is more about the photos.  I'll let you have a look in my next post, for now, here is the completed cover.


I will leave you now with this funny and absolute truth...


Take flight,


Ms. Ruin

Saturday, July 26, 2014

Altered Gift Bag

Hello friends --here are a couple of quick ideas to alter gift bags.  I went to the store and had a bag in hand and then I thought, "What am I doing?  I have all sorts of stuff at home to decorate a bag AND I have bags."  So this is what I made...


The bag in the back was stamped with a vintage baby buggy and then I adhered a flower to it.  The bag in the front took a little more work and a 3rd degree hot glue burn, it was worth it though!  I basically made a little chalkboard that they can remove and keep and then write their own messages.  Here are the steps for the second bag...

  • Paint a piece of chipboard (size of your choice) using at least two coats of Chalkboard Paint.  Allow chipboard to dry.  (Tip:  the chipboard will curl but when the paint dries all the way through, the chipboard will flatten).  If you don't have chipboard, try using a thin wooden board.
  • Adhere Maya Road Vintage Lace Tape around chalkboard.
  • Wrap hemp cord around chalkboard and secure in the back with a knot.  I also used hot glue to reinforce the position of the cord.
  • Glue chalkboard gift bag.
  • Embellish hemp cord.  I used Basic Grey, Maya Road, Recollections, Tim Holtz and Prima.

TA-DA!


The bags were a big hit and the best part is that my friend and her hubby now have a little chalkboard to use in their baby boy's nursery.

Until next time, peace, love, and extra special gift bags!


Thursday, July 3, 2014

Deserted Beauty

Hello  friends!  Thanks for stopping in to see my latest project.  This mini book is actually a design team project for The Crafty Scrapper.  When I first received it I wasn't exactly sure what I was going to do with it but at the last minute, it all just sort of came together.  Plus I had an opportunity to fuse my love of paper crafting with my love of urban and not so urban exploration.  You see, when I'm not painting chipboard I enjoy exploring abandoned places and capturing images to share with others.  Those of you who follow my photography are familiar with my motto, "I find beauty where most see atrophy."  I hope you are able to see the beauty too.


This lovely camera chipboard album is by the fine folks at Leaky Shed Studio and can be purchased at The Crafty Scrapper.  I also want to mention that all of the gorgeous paper I used in this album is from the "Accomplished" line of papers by Authentique.  You can find this paper right by the checkout!  A little bit about the cover which is typically the most embellished part of the book in my projects...I wanted to create a contrast between something beautiful and something, well, a bit on the mucky side because that's definitely what this book is about.  I chose a soft damask print for the background and then a bold brick print for the accent pieces of the camera.  All of the paper embellishments including the alphabet are by Tim Holtz and the flowers are by Prima.

Lets explore the inside of the book and don't forget that you can click on the images to view them larger.


This page holds a couple of pictures of an abandoned elementary school located in Premont, Texas.  I used a pocket from an old library book to hold my photos and a card that tells you a little bit about the photos.  


In case you're wondering how I got the pretty text on the Maya Road kraft tag, I simply printed the text on a regular sheet of paper, adhered the tag to the paper over the text, put the paper back in the printer and reprinted the text.  Be careful not to jam your printer!  If I had a typewriter, I would have used it instead. 


I really liked the way this turned out.  I'm not gonna lie, I was so frustrated with this page that I wanted to put the pictures sides by side, glue the Maya Road light bulb in the middle and call it a day.  But I walked away, got some sleep, and in the morning I churned this out with ease.  


The photo on the left flips open so that you can see the entire picture on the right and you can also read some details about these photos.  And just in case you can't see the print, these photos were taken in the ghost town of Medicine Mound, Texas which is located between Amarillo and Dallas.  We found the structural remains of a filling station and some really neat relics including the gas pump.  We continued down the road and drove through a field (remember, not so urban exploration) and found a very old grade school.  You can see that edifice on the cover of the book.  I don't think class will ever be in session again.  Or will it?


This old tractor was found next to an abandoned gymnasium in Shamrock, Oklahoma.  The town has few residents left and it appeared that the majority of the buildings were rundown.  I didn't do too much with this page other than cut along a couple of the clocks to tuck my photo into position.


I really like this page despite it's simplicity.  Sometimes when you have captivating photos, you don't want to clutter the page too much or you have one art form taking away from another.  I think a piece of burlap and hemp twine were just the right accents.  The Baker Hotel is located in Mineral Wells, Texas.  Is it haunted?  Likely.  But I'm drawn to it's towering beauty, sadly it lays in ruin.


On the flip side you'll find this image of an abandoned auditorium in Premont, Texas.  I am absolutely in love with this place but only have an opportunity to drive by it twice a year on my way home to South Texas.  And 9 times out of 10, my husband does not want to stop.  I don't know that I'll ever go back in there but I can tell you that I have been in there three times, alone, in the silence.  I have stood behind the curtains and peered out past the stage into an audience of empty seats.  Listen...you can almost hear them applauding.  


Who doesn't love old barns?  I know so many people that do!  How I wish I could have gotten closer to this old barn in Tennessee.  Again, the printed text on the kraft tag was made with my deskjet printer.  The pocket frame is by Tim Holtz and the Frozen Charlotte doll is by my friend artist AND author, Lisa Pace.


Does Tim Holtz have some of the best hardware or what?  I love all of these little trinkets.  This photo is really special to me.  I had seen this house so many times on I 35 North from Waco to Dallas.  One day, while traveling alone, I finally exited off the highway and spent a good 30 minutes studying a map and driving down side road looking for this house.  Well, I found it.  It was on a dirt road that had not been traveled in so long that the grass and brush had started growing over the road.  That's why I had difficulty finding the house!  But I found it --I traveled down the road with nothing and no one else in sight.  I reached the dead end and there I found this magnificent beauty.  I took my photos and then just stood there and wondered what her story was.  If those walls could talk, what story would they tell me?
  
For this last page, I used a really neat technique that you will want to try on your next project.  Hold off on the coffee, you're going to need a steady hand for this.  


For this page I took a Maya Road linen heart and laid a stencil over it and then gently applied a thick coat of Wendy Vecchi's Embossing Paste in white.  I promise, once you do this you will want to do it over and over...just imagine the possibilities.  I also stenciled some beautiful black birds on other linen hearts for a different project.  About the photo:  The gorgeous statue on this page was found in an overgrown cemetery in South Texas.  I doubt that old place has many visitors, but I have a hunch that this statue restores hope for the disregarded.


I hope you enjoyed my book.  If you would like to see it up close, please stop by The Crafty Scrapper in Waxahachie, Texas and tell them you are there to see Sonia's latest book!  And don't forget that you can also follow my art and my photography on Facebook and on Pinterest (the links are on the right).  Until next time...take flight!

Ms. Ruin

Wednesday, July 2, 2014

Design Team Challenge

I just realized while preparing a post for my latest project that I never did share this canvas...
 

This canvas was born from a bunch of random materials that had no rhyme or reason when put together.  The same material was sent to every design team member for The Crafty Scrapper and it was up to us to make it work.  I can remember looking at the pile and thinking "What in the hell am I gonna do with all of this?!?!?!"  But I managed to get it done.  

This was my creative process:
  • Adhered scalloped half circles from Maya Road Half Circle Chipboard Album around the canvas.
  • Adhered 7 Gypsies Numero Tissue to entire canvas with Glue n' Seal.
  • Disclaimer:  I don't like Martha Stewart, but dang she makes some good paints!  In fact, my favorite is Wedding Cake which I brushed across the canvas.  I was careful not to cover the entire canvas, I just did light strokes all over so that you could still see the tissue in the background.
  • Covered the entire canvas with Glue n' Seal --this protects the tissue from tearing.
  • Printed a photo of myself on transparency film using a laser jet printer and then adhered it to a piece of 7 Gypsies tissue using Glue n' Seal.  I also mounted it on a thin piece of cardboard because I ended up putting pop dots and behind it and I needed it to be sturdy.  
  • I stenciled the three leafy/branch like figures using a stencil and distress paints.
  • Made a crown piece using hot glue, hardware from my personal stash, Prima flowers (because they are the best), and other chipboard pieces from the Half Circle Chipboard Album --I sprayed the chipboard gold.  Once the crown was in place I...
  • Mounted the photo of myself using pop dots and added my journaling:  "This girl makes things happen."
  • Painted and adhered the last of the embellishments on to the page including the dragon fly on my lips which I colored with alcohol inks.  We also had a blingy tree sticker which makes me cringe because I would never in a hundred years buy something like that for a project because it's just not my thing --well, I took that tree, adhered it to a gold misted half circle and then glued the circle to the back of the canvas to complete the crown.  See what I mean...

We also had to make use of some pink Maya Road ribbon so i ran that along two sides of the canvas.  You can see it in the pic above and the pic below.


So there you have it.  Over all I like the way it turned out.  It's interesting to say the least.  haha.  I hope you like it too.

Come back soon, I have a fantastic project to share tomorrow.  

Take flight,

Ms. Ruin


Saturday, May 3, 2014

NSD 2014

Happy National Scrapbooking Day from Ms. Ruin's Playthings! Here is my blogpost for The Crafty Scrapper...

Happy National Scrapbooking Day (NSD) from The Crafty Scrapper!  This is Design Team Member, Sonia Doneghue, coming at you live from the annual National Scrapbook Day Retreat in Milford, Texas.  The gals have rolled in from all over North Texas and even the Hill Country to celebrate 3.5 days of creativity, delicious food, laughter and camaraderie over our love for crafting.

As we say in Texas, "go big or go home" and the ladies at The Crafty Scrapper know how to throw a Texas sized craft party.  But what's a party without gifts?  Each retreater received a gorgeous mason jar project complete with all of the items needed to create this magical fairy scene.

Carolyn and company will also host random prize drawings throughout the weekend and I have to say that they truly thought ahead and provided each of us with a brand new Crafty Scrapper Tote complete with craft goodies and enough room to carry our prizes home.  Plus, on Sunday, one lucky lady will leave Milford with a Spellbinders Grand Calibur Die Cutting/Embossing Machine and 3 die sets.  I hope the grand prize winner has room in their vehicle because the amount of crafting supplies that arrive with each person is quite ridiculous but oh so necessary.  And if you ask any of us, yes, we do need all of those things and much more too!

In addition to catching up on our own projects, Carolyn and Gena are hosting make-n-take stations.  Each make-n-take is quite unique and allows us to work with the latest craft products plus learning new techniques is always a bonus.  One of the make-n-take's is this neat little tin by the kind folks at Maya Road that donated the material to make these fabulous pieces of art.  Thank you, Caroline.  You and your laundry basket are missed.

Now I wouldn't be a good National Scrapbooking Day Retreat correspondent if I didn't take you behind the scenes!  Here are some more photos from our weekend...

Gelatos with Gena Make-n-Take

I took a HUGE gamble and didn't bring any paper crafting supplies.  Instead I am giving sewing a whirl.  I churned out my very first dress.  Details on my blog soon.

Lots of scrapbooking going on --after all, we're in the business of preserving memories!

This is actually a VERY TIDY version of a scrapbookers work table.  
We tend to get a bit messy.

Craft goodies from our Crafty Scrapper Tote!  Drool...

You can see more behind the scenes photos from our weekend on The Crafty Scrapper Facebook Page.  We hope that your weekend is filled with crafty goodness and to further commemorate National Scrapbooking Day 2014, visit The Crafty Scrapper today, Saturday, May 3rd, and wish the associate behind the counter a Happy NSD to receive 10% off of your purchase.  Doors open at 10am and close at 5pm.

Gotta run --it's time for my massage and then I have to get back to sewing!  Until next time...

Sunday, April 6, 2014

This project is a hoot!

Happy Sunday!  We're on the verge of yet another busy week.  I've been a little overwhelmed lately (story of my life) with Spring photo sessions and just life in general.  But I don't want to fall behind with my blog too much so I thought a great way to start the new week would be to tell you all about the adorable hoots you previewed in my last post.

So tonight I'll share how you can turn this:


Into this:


There are so many ways to alter these adorable wooden owls.  I have covered them with patterned paper, fabric, used bottle caps for the eyes, etc.  The possibilities are endless.  So lets talk a little about how I cut these little birds out in my wood shop.  Kidding!  I actually bought the wooden owls at Michael's.  They also sell other bird cut outs and YES, the legs are included.  ;)  


Alright, so lets jump right into how I brought my feathered friends to life.  For the pink and teal birds:  paint the bird using an acrylic paint of choice.  I used Distress Paints by Ranger for these and didn't even require a brush, I just painted the entire owl with the dauber.  Once the paint dries, grab a stencil and some embossing paste.  I thought the stencil shown above would give a cool "feather like" effect to the my owls.  Place the stencil over the bird and apply embossing paste with a spreading tool.  (Helpful Hint No. 1:  Keep your stencil from moving by using a tiny glue dot to keep it in place.  Remove glue dot AFTER the embossing paste has dried.)   


Gently peel the stencil off of the wood and your bird now has some really awesome texture as seen above.  Allow paste to dry before proceeding with next step.  Imagine all of the stencils you could use on these babies.  You can visit my my mixed media pin board on Pinterest to view other birds I've decorated.    


And now for the fun part --giving the bird a personality!  For these little gals I simply added googly eyes, beaks made out of orange polymer clay and hearts made out of white polymer clay.  I painted the hearts using distress paints by Ranger and then stamped initials on them using acrylic alphabets.  Warning, the clay is very slick and the stamps will slip and slide --press gently, firmly, and quickly.  Yeah, good luck with that!  Haha.  The final touch for these little gals was the ribbon barrette at the top.  I actually bought those at Hobby Lobby and they were already put together.  I simply hot glued them in place.   


(click images to view larger)

Now lets talk about these little guys.  For these particular hoots I used Martha Stewart paints and crackle.  I applied the base coat --orange on the little guy on the left and a light blue on the little guy on the right.  I'm sorry I can't recall the official names of the colors.  Once the base coat dried --oh, you can apply two coats of paint if you'd like --anyway, once the base coat is dry, apply the clear crackle.  Allow crackle to dry completely.  Apply top coat in the color of your choice.  I used the color Wedding Cake on both of these because I just love, love, love that color.  The paint will immediately start to crackle.  Allow paint to dry and crackle.  (Helpful Hint No. 2:  Practice your crackling on small pieces of chipboard by doing all of the steps above.  Applying the crackle with different strokes or even brush vs. foam brush can give you a variety of crackle effects.)  For these owls I used a stencil with the word love on it.  Just like I did above, I secured the stencil with a tiny glue dot and then spread black embossing paste over it.  Gently peel off stencil and allow paste to dry before removing glue dot.  Lastly, add googly eyes, polymer clay beaks and hearts.  

Ms. Ruin's Supply List Gal Owls:
Basic Crafting Tools
Wooden Owl
Acrylic Paints or Distress Paints by Ranger
Embossing Paste
Stencil
Googly Eyes
Polymer Clay (orange and white)
Barrettes or Ribbon
Alphabet Stamps

Ms. Ruin's Supply List Guy Owls:
Basic Crafting Tools
Wooden Owl
Martha Stewart Acrylic Paints
Martha Stewart Clear Crackle
Embossing Paste
Stencil
Googly Eyes
Polymer Clay (orange and white)

I promise, these little gals and guys are as fun to make as they are to look at.  Stay tuned --I've got an altered paint brush, and a design team challenge project to share with you in my upcoming posts.  Until next time, I'll leave you with a preview:


Peace, love, and a hootin' good time!

Ms. Ruin

Thursday, April 3, 2014

Altered Mason Jars

Hello bloggers and blog readers.  I've got a few projects I've worked on lately that I want to share with you but for today we'll zero in on a couple of gorgeous altered mason jars.

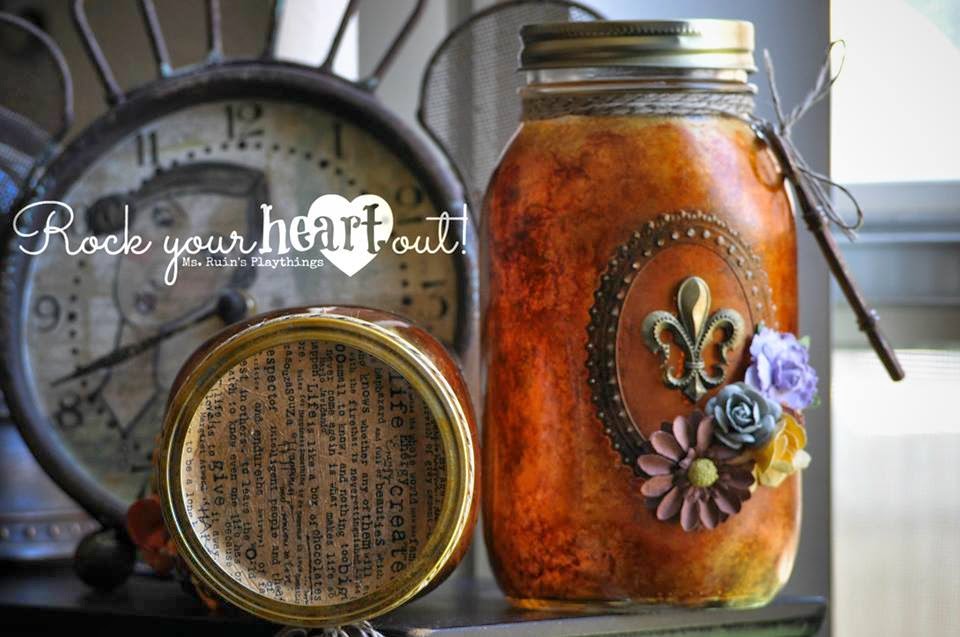
As you know, I run Artsy Fartsy, a swap community on Facebook, with the help of my friends DeeDee and Genie.  Each month we host a swap and for the month of March, DeeDee hosted an altered mason jar swap.  My partner told me she enjoyed vintage styling and she lives in Louisiana so a fleur-de-lis would be to her liking.  So with that little bit of insight I got to work.

Ms. Ruin's Supply List:
Basic Crafting Tools 
Alcohol Inks and a dauber
Paper Flowers
Embellishments
Twine
Tissue Paper


The first step I took to create this gorgeous project was that I applied a decorative oval shaped sticker to the jar.  This particular one is from Tim Holtz's Idea-Ology Industrious Stickers/Borders.

I then started inking the jar with alcohol inks on the outside only.  I used about three or four different colors, I believe they were ginger, butterscotch, raisin, and gold.  I applied one color at a time.  Keep in mind that you don't have to cover the entire jar with each color.  I however did cover most of the jar each time I applied an ink.  The key to getting that marbleized look is to simply tap the jar with the dauber repeatedly --kind of like using a sponge when sponge painting.  The gold ink was the only metallic I used.  I made sure to make it the last ink that I applied all over and then I went back over it here and there with other colors.  (Helpful tip:  Keep alcohol blending solution on hand just in case you don't like the way your project is looking, you can apply the blending solution and the inks will wipe right off. )

The ink dries very quickly so I was able to move on to the next step within seconds.  I wanted to bring out the details of the sticker a little so that they wouldn't get lost behind all of the inks I had just adhered so I took a sanding black and just scuffed it up a bit.  Since the sticker is paper, white was exposed.  I went back and dabbed alcohol inks over it.  You can also use distress inks for this.  

I took a handful of flowers from my flower stash and adhered those to the bottle with hot glue.  And trust me, those babies are not coming off of that jar without a fight.  I then applied the fleur-de-lis which is an embellishment I had in my collection for many years.  I used E6000 to adhere the embellishment.  One of the final steps was to wrap twine around the neck of the jar and then I tied down the key.  There is one final step which I will cover in a sec.


I actually had two jars on hand so I decided to decorate a second jar for a friend.  I used all of the same steps except that I stenciled the first letter of her name on the jar rather than using a fleur-de-lis embellishment.  When it was all said and done, I kind of wish I had also used an embellishment because she too is from Louisiana!  But I think it's just as pretty and personalized.  :)


Alright, the final touch on these jars was adding this printed tissue paper to the lids.  Remember, mason jars have those little plates that come right off so what I did is I traced the circle onto printed tissue paper, this paper is by 7 Gypsies.  Then I applied glue and seal to the plate and adhered the tissue.  Once that was dry I put a coat of glue and seal over the tissue to protect it from tearing.  Ta-da!  Project complete.


What's next at Ms. Ruin's Playthings?  In my next post I'll be showing you these sweet little hoots that hatched in my craft room over the weekend.  Until next time...

Peace, love, and alcohol ink!