Ms. Ruin's Playthings


"The imagination imitates. It is the critical spirit that creates." -Oscar Wilde

Tuesday, February 26, 2013

Linen Album

Hello bloggers!  I am a little behind with my blogging but here I am, fingers to the keys, and the Avett Brothers serenading me in the background.  I have been working with canvas quite a bit lately but I also completed a design team project and that's what I'm going to share in this post.    I am not making a product list, I will just talk about some of the things I used and the techniques where I feel a prompt is necessary.  But you can always leave comments if you are curious about something.  Also, remember that you can click on the images to see a larger view of the project.  

Ladies and Gentlemen, I give you THE NEW MAYA ROAD LINEN ALBUM!  Hahaha.  


This is a 4x6 linen album by the folks at Maya Road --in case you didn't catch that earlier.  This is new to their inventory and I've got to say, it was so much fun to work with.  The album is fabric so it does not stand on its own, however, I used cardboard in this baby so it NOW stands on its own!


This super cute project was made possible by my super cute nephews, Jack and Jacob.  A big thank you to one of my best friends, Rae, for letting me use her adorable babies in my book.  Oh, I wanted to add that I did take these photos so I didn't feel too bad using them.  LOL.  Plus this will be a gift for Rae once it is returned to me.


About the cover:  I used hardware by Tim Holtz and then adhered a Maya Road flower to the center.  The pretty burlap piece is by Little Yellow Bicycle.  Definitely one of my newer and most favorite products!


This page has TOO MUCH CUTENESS I almost can't stand it!!!!  This is one of the pages in which I chose to use corrugated cardboard.  I poured paint right onto the cardboard and let it run.  Once it dried I distressed it with Vintage Photo Distress Ink by Ranger.  The crown is chipboard by Maya Road which I dabbed with gold acrylic paint.  The linen tag is also by Maya road.  The cork tag is by Little Yellow Bicycle.


My name is Sonia and I love cardboard.


Meet Jack!  More cuteness!  The canvas star embellishment is by Little Yellow Bicycle (LYB) and the flower and bird are by Maya Road.
 

I wanted to point out that I did use gold alcohol inks on the bird.  I also cut a heart out of corrugated cardboard (surprise, surprise), painted it with white crackle paint and then distressed the edges.  


Twine, arrow stamps, and house by Maya Road.  Flower by Prima.  Key by Tim Holtz.  Stamp on tag by Tim Holtz...it's from the Classic Favorites Collection and it has seriously become one of my very favorite stamps.


I wanted to highlight this sweet little bird.  I used the bird in the previous page as a stencil and drew this little guy on burlap.  Then I stamped the word "soar".  The stamp is from the Art Journaling stamp set by Maya Road.


Okay, I decided to cut out two little burlap birds!  This one I misted and then added ribbon and a button.  The possibilities are endless!


I wanted to point out the cutting technique I used here.  I first stamped the paper using another stamp from the Classic Favorites by Tim Holtz/Stampers Anonymous, then I cut along the lines using an exacto knife.  I then slid the photo under the stamped portion of the paper.  Does that make sense?  With this technique you don't have to worry about matching up paper.  


Awesome embellishment by LYB!


I decided to make a pocket at the very end because I had a bunch of photos left.  Cardboard is your friend.  Check out those grungy alphabet stamps --new from Tim Holtz.  


There is no REAL reason for this photo --other than I wanted to show you more cuteness.


Oh!  Here's another bird that I cut out using the Maya Road Vintage Trinket Bird as a stencil.  I kinda have a bird problem too.  But I make not apologies because it's "my thing".  The burlap is by LYB and that gorgeous trim is by Maya Road????  Maybe.  I'm not 100% sure but I will find out.  :)

Thanks for visiting and viewing my project.  Come back soon for previews of the March Madness Sale at Ms. Ruin's Plaything Etsy.

Peace, Love, and The Avett Brothers


Sunday, February 17, 2013

New Listings!

I've got three new listings in my Etsy Shop and they are SUPER AWESOME!  Click here to access the store and if you don't see anything you like, come back in March for the March Madness Sale.  LOADS of new stuff coming to my shop...not only jewelry but mixed media too!  Until then...here is some eye candy.  

Click on the image to take you to the listing.  


Linen Love


Stay tuned!  I will be posting about this lovely piece tomorrow.  It's a BRAND NEW linen album by the folks at Maya Road!  Just look at all of the delicious details!!!  

Tainted Love Project - The Finale

Concept & Photography:  Ms. Ruin
Model & Makeup:  Christina Revis


"I still press your letters to my lips,
And cherish them in parts of me that savor every kiss
I couldn't face a life without your light 
But all of that was ripped apart
When you refused to fight..."

Tainted Love Project - Day VIII

Concept & Photography:  Ms. Ruin
Model & Makeup:  Christina Revis


"I won't listen to your shame.  You ran away, you're all the same..."

Tainted Love Project - Day VII

Concept & Photography:  Ms. Ruin
Model & Makeup:  Christina Revis


"You sold me out to save yourself..."

Tainted Love Project - Day VI

Concept & Photography:  Ms. Ruin
Model & Makeup:  Christina Revis


Tainted Love Project - Day V

Concept & Photography: Ms. Ruin 
Model & Makeup: Christian Revis


"The air around me still feels like a cage and 
love is just a camouflage for what resembles
 rage again."


Sunday, February 10, 2013

Say Cheese!

Hello bloggers!  As most of you know, I love-love-love to take photos!  So when I saw all of the new neat camera related papers and embellishments and chipboard out there I was beyond stoked.  Fortunately for me, the ladies at The Crafty Scrapper hooked me up with brand new Bo Bunny Mama-Razzi 2 papers  and brand new Maya Road!  This album was beyond fun to put together...I hope you love it too!

I don't often get to make mini books about my trips so I thought I'd take advantage of this opportunity.  Last year I went on several trips including a very dreary trip to New Orleans.  It rained THE ENTIRE TIME we were there.  :(  But I still managed to get out and about and snap a few photos.  Although I didn't get to some of the places I really wanted to revisit or visit for the first time, I think I still managed to capture the Spirit of the Big Easy with the time that Mother Nature allowed.  The first thing I did was pick out all of the photos that I might possibly use.  The next step was converting them to square images and adding a Polaroid border.  Since the Maya Road Say Cheese Camera Album looks like a vintage Polaroid style camera, I thought it would be fitting.  Although I scaled the images down so that they were not full size or Polaroid size photos, they were still super cute and functional for this "mini".  Once I had the photos reformatted and printed, I was ready to get started!

But wait!  Before I get into the nitty gritty, I really want to showcase the following papers from Bo Bunny's Mama-Razzi 2 line because they really made the project come together beautifully and if I had not bought these, I think my project could have had the potential to fall flat.


From left to right we have the Mama-Razzi 2 Stickers, Contrast, and Darkroom.  I used A LOT of these stickers to make my own embellishments and I used the papers to make pockets and overlays on just about every single page.  Okay, NOW we can truly get started...


***DON'T FORGET THAT YOU CAN CLICK ON EACH IMAGE TO ENLARGE IT!***


 This is the cover of the mini.  As I mentioned before --the chipboard album is by Maya Road and it is the "Say Cheese Camera Album".  The entire book is covered with Bo Bunny paper from the Mama-Razzi 2 line and all of the edges were inked up with Vintage Photo Distress Ink by Ranger.  The paper speaks for itself, it's beautiful.  The only thing I added to this paper was the stamped image on the upper right side of cover (around the flash).  That stamp is by Bo Bunny, also from this line.  The tin in the center is by Maya Road and I added a sticker from the sticker sheet I shared above.  Kudos to The Crafty Scrapper Manager, Gena Glover, for giving me that idea.  The image in the tin is a piece of film that makes a heart --clever!  I did cover the flash with Mustard Seed Distress Ink and then lathered it with Distress Crackle Rock Candy.  The green film strip is also a sticker from the Mama-Razzi 2 line.  I adhered it to a piece of cardstock and then glued it right onto the cover.  As for the cover photo, I wedged it into the cover to make it look like a Polaroid camera releasing a photo.  You can see closeups in the images below.


I'm not going to show you every single page I think this book makes anywhere from 10-12 pages (I don't remember).  I do however want to highlight the stamps that I used on this particular page.  These stamps are by Maya Road from the Picture Perfect stamp set and the Perfect Shot Arrows stamp set.  Now remember I said I used a lot of elements from the Bo Bunny Darkroom and Contrast papers?  Well, I cut out these films strips from the Darkroom paper and then put my photos in the boxes.  The strip that is shown in this photo had three boxes--I put photos in the top two and then folded the bottom one to use it on the next page...you will spot it in the following photos.  ;)


I love this page.  It has a lot of attitude and all around "fun" to it.  Again, I used an image from the Darkroom page and I was careful and cut around the miniature Polaroid which I stamped the letter "d" on.  This allowed me to stick a photo behind it.  You will see this technique throughout the entire project.  The "Oh Snap!" is from Bo Bunny's Mama-Razzi 2 stamp set.


One of my favorite elements from this page is the wooden Polaroid frame which is from the "You've Been Framed" by Maya Road.  I stamped the words "Say Cheese" from the "Picture Perfect Cameras" stamp set by Maya Road and I stamped that on the film strip frame that I folded over from the previous page.


This page has a lot of charm too.  The cork board tag is by Little Yellow Bicycle.  Okay, how cute is that chipboard camera?!?!?!?  It's so cute it's downright ridiculous!  That's also by Maya Road from the "Say Cheese" collection. 


Again, I cut out images from the Darkroom paper and cut around the cameras to make a pocket that holds about 5-6 mini Polaroids.  This will allow onlookers to pull the photos right out and look through them.  Then they can simply tuck them back into place.  Mini pockets rock!!!  Okay, that was super nerdy, wasn't it?


Yet another pocket made to share several photos per page.  This pocket was made possible by the Contrast paper.


And another pocket!  This particular pocket was made using the Contrast paper as well.  I simply cut a slit along the top portion of the banner and was careful not to put glue on it when adhering it to the paper.  Instant pocket!


Same technique with this pocket.  This particular pocket was made using an image from Darkroom paper.  The stamped filmstrips are from the Mama-Razzi 2 stamp set.

FIN!

I hope you enjoyed my project as much as I enjoyed bring it all together.  Now go out and get this paper and all of the products I used because they're waiting for you at The Crafty Scrapper!  

Peace, love, and camera stuff...

Ms. Ruin

Tuesday, February 5, 2013

Tainted Love Project - Day I

Concept & Photography by Ms. Ruin


"The promises were spoiled before 
they left your lips..."

To view entire images, visit me on Facebook.

Sunday, February 3, 2013

10 Days of Tainted Love

I am kicking off 10 Days of "The Tainted Love Project" on Through These Eyes in just a few days.  The Tainted Love Project is a collaboration between two artists.  There's me, Ms. Ruin, who came up with the concept and imagery of a woman tainted by love.  And then there is make-up artist, Christina Revis who is also the model for this project.  Although the project doesn't officially debut until Tuesday, February 5 and ends on Valentine's Day, I couldn't help myself and have already posted four images from the project on Facebook.  Everyone is excited to see more and that excites me too!  I am thrilled that my vision has been so well received.  I know that it has made some people uncomfortable, but art isn't always cozy.  So stay tuned!  I will be posting a daily photo on Facebook and here on my blog.  Can't wait to hear your thoughts on this project.  For now, enjoy the sneak peeks...  

::cue the music::

Contempt loves the silence.  It thrives in the dark with fine winding tendrils that strangle the heart.  They say that promises sweeten the blow but I don't need them.  No, I don't need them...  


Saturday, February 2, 2013

More birds!

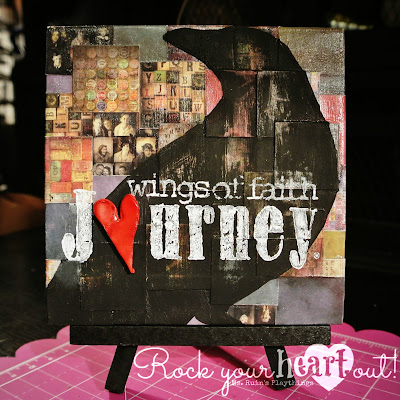
Are you sick of all of my bird projects yet?  Well, I'm sorry.  But I'm just getting started!  I wanted nothing more than to sleep in today because I have a big day tomorrow (Sunday) and during the week I'm up pretty early.  But of course I was wide awake at 5:30am thinking of all of the projects I wanted to work on today because I declared it Craft Day.  So what did I make?  More bird projects!  In fact, I made two pieces of wall art and one table top piece that sits on a miniature easel.  

Project Number I:  Journey on the Wings of Faith!

 This is a 6"x6" in canvas.  I basically cut 1" squares and then glued them onto the canvas.  I then covered all of the squares with Mod Podge just to give it a good seal and keep the paper from tearing.  While that was drying I drew several ravens and cut them out to use as stencils.  I placed the stencil on the canvas and outlined it with black paint and then filled it with black paint.  I allowed it to dry and then took a wet paper towel and rubbed different parts of the bird to make it semi-transparent.


My last step was adding the words using stamps, paint, and alphabet stencils.  The words "wings of faith" are from the new art journaling set by Maya Road.  Didn't I say you needed that set of stamps?  :)  The heart was made with polymer clay.  This canvas sold the minute I posted it.  

Project Number II:  Hands are for shaking, not tying. 

This is a 6"x6" canvas.  I basically repeated the process with all of these pieces.  I did a lot more stamping on this one.  These words are from the song "Fell on Black Days" by Soundgarden.  This is probably one of my favorite lines ever.  The actual words are "So don't you lock up something that you wanted to see fly.  Hands are sharking, no, not tying."  Isn't that powerful?  Sometimes it's difficult to let someone go.  But if you truly love them, you want to see them soar, you want them to succeed.  And maybe they can't succeed with you...so why hold on?  Why tie their hands?  And why tie your own hands?  

I love this one so much I almost don't want to let it go.  But if it will inspire someone other than myself, then I want to see it fly!  

Project Number III:  Journey on the Wings of Faith! 

Here is another piece with the same message.  However, this is not canvas!  This is actually a 4.5" x 4.5" piece of wood.  This one will be sold with this cute little black easel so that it can be displayed on a table top , window sill, etc.  

This piece is .25" wide.  It's slender and small but still packs a punch of emotion and good feeling.  This project and project no. 2 will be available in my Etsy shop in the coming days.  Stay tuned!

I hope you enjoyed my projects.  I am really enjoying this surge of creativity!  Tomorrow I will get to explore my visual art --I haven't picked up my camera since December so I hope I'm not too rusty.  I will be working on an artistic shoot for Valentine's Day.  More details to come.  Until next time...peace, love, and wishing this day had more hours.