One very beautiful thing came out of a melt-down of a day...Regal Tweet No. 3 in the series. I am rather fond of him. I think he's beautiful. ::smile::
Ms. Ruin's Playthings
Saturday, June 23, 2012
Tuesday, June 19, 2012
Regal Tweets by Ms. Ruin
Sound the horn...introducing Regal Tweets by Ms. Ruin! I will be creating a series of wooden birds just like the first two in this series and all of them will be up for purchase in my Etsy Shop. Regal Tweets are perfect for your desk, coffee table, book shelf and make perfect inspiration gifts for just about anyone, including yourself. ;) So stay tuned, these little tweets need a home and I will be showcasing them soon in Ms. Ruin's Playthings Etsy Shop. Lets take a look at the first two tweets in the series. Oh, but before we get started, lets look at "the before"...
Do you see nothing, or do you see possibility?? I see possibility! So this is how the Regal Tweets start out, nice and plain.
And this is what they become when I am through with them. This is the very first Regal Tweet in the series and this little fella dreams in numbers. He was created with metal reactive paints and patina. His crown is made of chipboard and covered in gold adirondack paint. The numbers are stamped and so is the word "DREAMER".
The second Regal Tweet was also created with reactive paints and patina. I used iron on this little guy. I gave him an eye which was actually a metal brad, and a really cool crown because otherwise he would just be a tweet. I also added the wood blocks that spell the word fly.
Again, the illusion of texture meets the dimension of the letter blocks.
Thanks so much for looking --I hope to be creating more tweets for this series in the near future. Stay tuned...
Ms. Ruin
Saturday, June 9, 2012
Bros before Hos
I hope this project doesn't offend anyone, it was meant to be funny...but if it does, well, you'll get over it. This started out as a project I was going to make for the Smudgy Antics Challenge but I decided against it since the only "stamped" portion of it was the words. So anyway...I'm not going to go into full details of how I did this because as you can see...it's just a lot of pre-printed die-cuts, buttons, twine, lace, and canvas with flock on it. If you have any questions, just drop me a line! Oh...and for those of you that like all of the little detail shots...here's a bonus shot, but as always - you can click on the images to view them larger. Have a great weekend!
Anything Goes
I decided to join the Smudgy Antics Challenge this week with a theme of "Anything Goes". This is my first challenge with this group so I'm excited and I hope that they like what I bring to the table. Here's a little art therapy --something I created this morning as the challenge ends today. My anything goes is about foolish hearts. I was inspired by a poem I wrote where I question my own heart and ask "what are you good for anyway, you're nothing but trouble." Face it, we all play the fool at some point in our lives...I'm not afraid to pour that into my art. So without further ado, I present you with my foolish heart.
I love layers and I love texture. So I REALLY LOVE this project because I got to use both techniques.
I first took a canvas that already had a black flocked design on it. I primed it with a spray primer and then painted over it with bronze reactive acrylic paint. I did a base coat and then added a second coat, at which point I sprayed it down with Patina. I set it aside to dry and I moved on to the next layer. I took a wooden slab --I think this measures about 4"x4". I adhered a grunged up photo of myself and sanded the edges. I sanded the edges and then stamped silver scroll work on both sides of the photo (over my black hair). I painted the edges of the wooden block with black acrylic paint and then set it aside to dry as well.
Then I moved on to the focal point of this mixed media piece --the foolish heart with all of it's little secrets. The key is by Tim Holtz...I sprayed patina directly onto it to give it a bit of a mossy look. I also took a porcelain crown that was white and I painted it with reactive acrylic paints as well. I think I used brass on the crown. I sprayed it down with Patina and then set it aside to dry. While the key and crown did their thing, I went ahead and worked my magic on that little foolish heart. All the while I was thinking that I really wanted to journal but I was struggling with "where" on my project I was going to have room for journaling. I kept that in the back of my mind as I started working with the heart. I took a thick piece of cardboard and stamped the heart on it. I cut it out and when I was cutting it I noticed that the layers of cardboard were easy to peel back. I knew exactly where I would do my journaling! You'll see soon enough. I punched two holes on the left side of the heart and wrapped and tied hemp through the little holes and made a knot. I then glued lace to the backside of the heart, and glued the key and the crown to the front of the heart. HOT GLUE IS YOUR FRIEND. :D And now to the really cool part...
I split the cardboard in half with my fingers --just pulled away at a nice thick healthy corner and I added my journaling to the inside "My foolish heart...what are you good for anyway?" Ta da!
Thanks for looking and I hope you enjoyed my foolish heart project!
Y Ms. Ruin
Wednesday, June 6, 2012
Ver-Day Everyday!
I have recently started playing with Ver-Day Patina and reactive acrylic paints. These paints have metal particles in them that react to the patina and make your projects look amazing! I won't educate any further because the girls at Ten Sceonds Studio are complete experts at this and you can see their online video tutorial by clicking here.
I didn't exactly follow the rules on these projects --I became a little impatient and helped the drying process by using a heat gun, I also used a sponge brush which according to the video is a no-no. Plus I went all crazy and used ALL of the paints on one project. HAHAHA. But these are just my first two projects so cut me some slack.
Project Number I: Wall Art
I bought this piece of wall art at Jo-Ann's for 50% off. Score! But that green color is just not flying with Ms. Ruin. Now I should have primed this first but I didn't --but it still worked out. Hey, I don't always follow the rules and I still get favorable results. Think outside the box, color outside the lines, LIVE A LITTLE! ::composes herself:: ::cough:: Okay, now that I got that out of my system...here is the wall art BEFORE the reactive paints and patina:
And here is the wall art AFTER the reactive paints and patina:
(click images to view larger)
Now that is craftastic!
--------------------------------
Project Number II: Plant Thingie
This is a plant thingie - plant holder - guy in a robe standing next to a pot thing. Oh Lord, I am terrible at this. You get the point! This was completely WHITE. I don't have a before picture --bummer. But I'm talking stark white, no trace of a tan, would scare away women at the beach. Yeah, that pastey white. Anyway, now that I have painted and patinaed (I made that word up) him, he is a dapper little fella and the chicks (in my office at least) cannot get enough of him. Keep your hands out of my pot!
Funny thing about the word Patinaed --yanno, the word that I made up...anyway, if you scramble the letters around you can spell the word painted. ::nerdy laugh::
Thanks for visiting!
Tuesday, June 5, 2012
Love
Here is another photo from my visit home (The Rio Grande Valley). I wish I had dedicated more time to photographing...but spending time with my family was much more imporant. For sure. You can see more pictures from my trip on my facebook photography page. :) And don't forget that you can PIN all of my photography and my art on Pinterest!
Sunday, June 3, 2012
Skull Appreciation Day
Welcome Smeared and Smudged Hoppers and Happy Skull Appreciation Day to you! My project didn't turn out as cool as I wanted but I had this vision of decorating an altered wallet --so I did. Again, not superb, but hey, it has skulls on it!
I first started with this little canvas wallet by Maya Road. These are very durable and they are great to alter and keep as decorative pieces. However, I want something that I can carry and use and throw in the washer if necessary. You can also dry these in a dryer but I will not be doing that with this one because I used embossing powder. Can you imagine?
My first step was to stamp MS. RUIN on the front of the wallet with acrylic stamps and an embossing pad. I poured black embossing powder over the letters and then applied heat. I made the mistake of taking a brush and brushed embossing liquid onto some of the letters and then went through the embossing process again. I didn't really care for that method so some letters are darker than others, but that's okay.
I then stamped skulls all over the back side also using the same embossing process. These cute little skulls are by Dyan Reaveley from her Dylusions line.
Check out this cute little lightning bolt. I drew it on the canvas wallet with a marker then I took a paint brush and dipped in embossing liquid and filled it in. I then poured the black embossing powder and applied heat.
Okay, so how did I dye it? Well, I took a small plastic tub and put hot water in it and then added Rit liquid dye --just like this one shown here. In fact, I used the wine color. I then dipped the canvas bag in it and let it soak for about 5 minutes. I also dyed the white lace which turned it into a pretty mauve-ish color. I rinsed everything under cold water and then placed them outside to dry. Once everything was dry I adhered the lace with hot glue. Remember, hot glue is your friend!
And that my dear friends is how I made this very easy skull appreciation day wallet. Now I just need some money to put in it. :)
As a bonus I am going to feature a tag I made a couple of years ago featuring a dapper skull man. I now see all the things I would do differently had I created it today. But I didn't...so here is my throwback skull tag to add to today's hop!
Thanks for looking! Happy hopping...off you go to see what Kat has waiting for you on her blog!
As a bonus I am going to feature a tag I made a couple of years ago featuring a dapper skull man. I now see all the things I would do differently had I created it today. But I didn't...so here is my throwback skull tag to add to today's hop!
Thanks for looking! Happy hopping...off you go to see what Kat has waiting for you on her blog!
Terra
Tori
Black Dragon
Monique
Helen
Lady Brayton
Fiona
Christine
Jane
Judy
Alison
Susan
Andrea
Smudger Challenge
Laura
Lisa
Kristy
Steph
Glittery Katie
Lisa
Kapree
Ms. Ruin <--YOU ARE HERE
Kathi
Bombshell Stamps Blog
Dianne
Donna
Nydia
Lady Coral
Suzi
Julia
Patti
Miko
Renee
Wendy
Christina
Hazel
Skye
Wenchkin
Betsy
Scrapbook Stamp Society
Tori
Black Dragon
Monique
Helen
Lady Brayton
Fiona
Christine
Jane
Judy
Alison
Susan
Andrea
Smudger Challenge
Laura
Lisa
Kristy
Steph
Glittery Katie
Lisa
Kapree
Ms. Ruin <--YOU ARE HERE
Kathi
Bombshell Stamps Blog
Dianne
Donna
Nydia
Lady Coral
Suzi
Julia
Patti
Miko
Renee
Wendy
Christina
Hazel
Skye
Wenchkin
Betsy
Scrapbook Stamp Society
What a special night
Last night was nothing short of amazing. I got to see The Avett Brothers for the very first time at the Verizon Theatre in Grand Prairie, Texas. There was no opening act and they played three solid hours. They made me laugh, they made me cry, they made me clap, they made me dance, they lifted my spirit so high. Thank you, thank you, thank you. I am an Avett fan till the day that I die! This is one of my favorite pictures from the evening but I'm still sorting. I probably took about 100 pictures but there's only a handful that will be decent. I used my point and shoot and I was having a hard time finding the right settings. This particular shot was taken in Program Mode with an ISO of 3200.
Check it!
Awwwwe! I was so flattered that TCS was selling this kit by "SONIA DONEGHUE" <--that's me, at the Great American Scrapbook Convention. It was really neat to see people picking up these little packages. And what a great price --just $14.99 to make this super cute coin purse. :) More pictures to come from my brief visit to the convention.
Monday, May 21, 2012
What doesn't kill you...
There are many sides to being a victim of abuse. Some days I feel like I have no sides, I am just a black mass, bouncing around the walls of life –gravity working against me, for I have endured emotional, physical, mental, and sexual abuse that spanned more than half my age. It’s easy to let those experiences define me. It’s human nature. I have self-pity too. But I’m blessed that the majority of the time I am strong in the face of adversity. Hell, if I wasn’t going to get myself out of these abusive situations, well mainly my domestic situation, why would anyone ever want to extend a lending hand? “She deserves it…she won’t leave him.” When you allow a sadistic human being to have an inch of you at your weakest, they will continue to break you down…daily, hourly, minute after minute…even when they are silent. I WAS a victim. Today, I AM a survivor.
As I mentioned earlier, there are countless sides to being a victim –each one just as complex as the previous. Today I’m writing about survival…the feat of coming out on the other side. For some it is liberating and empowering, however others don’t recover long enough to function in any type of normalcy and they quickly fall back into the pattern of being abused. I am thankful that I have been able to love myself again and I don’t have a problem sharing my own experiences with others. I get it; some people don’t want to share the hurt that they have endured in life. Quite the contrary for me, scrapping the hurt (clever, I know) is therapeutic. So this weekend I scrapped the hurt and poured my scarred heart into this mini canvas album. This mini is a celebration of breaking the silence. I am thrilled that I had the opportunity to fuse my various forms of art together to make one cohesive piece. In this post I will walk you through the aesthetics of the book as well as touch on some of the emotion through my images, my own words, quotes, and song lyrics. Oh, one important note –you can see, feel, and hold this book at this year’s Great American Scrapbook Convention! Just stop by the the Crafty Scrapper’s booth and they will point you in the right direction. I hope this speaks to your heart…
***CLICK IMAGES FOR LARGER VIEW****
Oh, and please excuse any typos and grammatical errors --I wrote a lot and don't use spellcheck.
This is the cover of the mini canvas book. It’s actually a chipboard album covered in canvas and it’s made by Maya Road. I stamped the foliage on the upper right hand corner using black archival ink. The stamp is by Tim Holtz. The rose flowers are by Prima but I’m not sure who the other flowers are by. Sorry. More detail about this cover in a bit.
I also stamped the spine with a Tim Holtz stamp using black archival ink. I then fastened these kraft hearts using a large pin and then tied the ribbon directly on the pin. These ribbons will be changed out when the book arrives at the store. I want them to be purple because that is the color of domestic and family violence awareness.
And we’re back to the cover to look at this little trinket box. This little box is by Maya Road and actually housed buttons when I purchased it but you can do all sorts of awesomeness with it. I decided to make a little shadow box. I first changed the color of the silver box to antique gold by using gold, latte, and butterscotch alcohol inks by Ranger. I then cut a piece of scrapbook paper and journaled the words “Live to Tell”. I then alcohol inked a little doll –this one by Tim Holtz. I used gold and currant on the doll. I then added a Prima rose and a Prima heart-shaped button. Pretty neat, huh? Come to think of it…I’m not sure that button is by Prima Marketing…but I’m about 80% sure that it is. I’m not known for my attention to product detail. I don’t know what’s hot and what’s not in scrapbooking –I just create!
I love, love, love this heart! I have used it several times in other art and I can’t get enough of it. This is one of Tim’s first releases. Oh heck, I will call him Tim if I want too –everyone knows who Tim is. What better way to express a healing heart then stapling down the middle! And this heart wouldn’t be complete without the purple ribbon for DV awareness.
Yep, we’re still on the cover of this monster! I wanted to highlight this handmade prize ribbon inspired embellishment that I made. I used burlap trim by Maya Road, a wooden banner by Prima (I think), alphabet stickers by Creative Imaginations (I think), a journaling piece by Maya Road, and a flower by…well…it looks like Prima but I’m not certain. Remember, hot glue is your friend…until you accidentally stick your finger in a glob of it and then the gloves come off! Anyway, I glued the wooden banner to the burlap, put the stickers on the banner and distressed them with a sander, mounted the journaling piece at the top of the banner and then glued the flower over the journaling piece. TA DA! Okay, I promise…you can now see the inside of the book!
First up is this beautiful chipboard frame which gives you an almost full view of the second image in my book. This chipboard frame is by Maya Road (surprise, surprise). I misted it with Dyan Reaveley’s Dylusions spray mist –whatever her purple color is called. I then stamped some leaves on the edge also using Dyan’s stamps and bird is ALSO by Dyan. I stamped that little fell on kraft paper, cut him out and then glued him to the corner of the frame. Turn the page frame.
“Here’s the weight of the world on my shoulders…” from the song “Fly from the Inside” by Shinedown...in the backround a self pic with a broken heart. I added this image when I was completely done with the project because I did not like the chipboard showing in the background when looking at the album from this position. On the right is the now second image of the book. Yep, that’s Ms. Ruin –a domestic violence SURVIVOR. “She’s picking ghostflowers from her soul” is from the song “Ghostflowers” by OTEP. It reminds me that I can recover from the trauma but I’ll always have little remnants of the past inside of me. You just don’t forget. Ever.
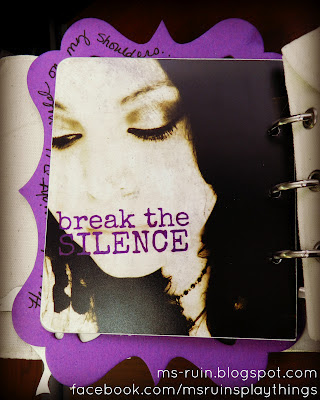
People wonder why I kept silent about my domestic abuse for so long. I knew that they knew…so why didn’t I open my mouth? I had shame that I had put myself in such a situation and I thought that at all costs I was going to turn it around. Little did I know that my silence was killing my loved ones. I will never forget the day my mom shared how upset and anxious my father would get when he would try calling me and I wouldn’t answer the phone. Keep in mind, I was 20 hours from home. She told me that he would say “For all we know, he’s gone off and killed her…” That crushes me every time I think about it, just as it pierced my heart when I typed it for you to read. :*(
The cool thing about this little canvas book is that it also comes with two canvas pockets! This is the first pocket. I used some Dyan’s stamps and another journaling thingie by Maya Road with a picture of me strategically placed inside…so now it’s also a picture frame! Brilliant, I know. :p
The chipboard and journaling thingy are by Maya Road. I really need to quit calling it journaling thingy…I don’t know the official name…heck, I don’t even know if they are for journaling but that’s what I would use them for! Again, I misted the chipboard using Dyan’s spray mist. As for the quote on the right side of the book –well, it’s a fancy way of saying “everything happens for a reason”. But I do like to think that everything I endured was purposeful…I can’t imagine my life without all of the events that brought me to this point in time. The good, the bad, and the horrible.
The words “Coming out of the dark” remind me of the days we spent on the road between Tennessee and Texas. I sat in a U-Haul nestled between my mother and father who had come to rescue me and take me home. I can remember being so happy…we laughed and sang and told jokes all the way home. I don’t think I had smiled so much in a very long time. I was slowly emerging and for the first time in a long time I didn’t have to pretend to be happy –I was TRULY happy. I shared with my father that I loved that trip home and he told me that he enjoyed it too but didn’t really want to ever do it again. ::big smile::
This is a large chipboard piece by Maya Road. I put a couple of my pictures on it and then sanded the edges and also ran the sanding block all over the surface of the photos to give them a distressed look. I then stamped the word journey using one of Dyan Reaveley’s stamps and then placed a raw piece of chipboard over it and outlined it with a black pen. I finished off this piece by journaling a quote from the book “The Shack”. I absolutely love this quote and it has resonated with me since the day I read it….”Pain has a way of clipping our wings and keeping us from being able to fly, and if left unresolved you can almost forget that you were ever created to fly in the first place.”
On the backside I used Maya Road, Maya Road, and oh yeah, Maya Road. I misted the chipboard piece with Dyan’s purple spray mist. I then positioned chipboard letters spelling the word “NOTES”, essentially using them as stencils. I then misted over the entire chipboard using Maya Mist –I think it might have been the Iridescent Pearl Mist but I’m not 100% certain. Once it dried I outlined the letters and the chipboard with a black pen and then proceeded to do my journaling. These are lyrics from the song “Fly from the Inside” by Shinedown. Also, I wanted to mention that this didn’t photograph very well, but this piece is very sparkly and rich…very pretty.
We have reached the other canvas pocket in this mini. Let me say that I don’t know that I would ever speak to my ex-husband again…even if I had the opportunity. He is now a perfect stranger to me. But here is some insight to what I WOULD say to him if I just had too. “Dear Abuser, You left me shattered and broken. You said I was unlovable. Boy, were you wrong! You will know me by the scars I bear…the only way I would ever allow you to know me again. YOU are not worthy of my good life.” Bravo to Dyan Reaveley for making that awesome stamp that says “I don’t like you. You’re very ugly and have no manners at all.” Perfection! See that big burlap button at the top? I made that. I cut up a burlap sack and wrapped it around an oversized bingo chip and then added the white trim to it. I like it. I took advantage of the pocket and made a tag that can be pulled out. These words were inspired by the song “You Love Me” by Kelly Clarkson. The tag reads: “You said I wasn’t good enough but what you really meant was you’re not good enough.” You couldn’t deliver so you turned it around and opened my eyes while breaking my heart.” ::EXHALE:: True story. The tag was misted with Dyan’s purple spray mist. The bird on the tag is also from Dyan’s stamp collection and the burlap is trim by Maya Road.
On the back side of the second canvas pocket adhered brown roses that are actually really beautiful and frilly trim by Maya Road. I then misted the Maya chipboard and glued it directly over the trim with picture intact. The journaling is from the song “Fine Again” by Seether. It reads “I am aware that everything is gonna be fine.”
I love this sentiment…the thought that I’m perfect even with all of my flaws. I wasn’t perfect for him, but I am perfect for so many other people in my life that can love me even with all of my imperfections and in fact, I am VERY okay with that.
My book closes with this lyric by the beautiful Kelly Clarkson: “In the end, the day I left was my beginning.” Fortunately for me, I have been surrounded by so much love and support…I didn’t ever feel the need to be in his life again. I am truly blessed.
If you or someone you know are in an abusive relationship, please get help by calling the National Domestic Violence Hotline at 1-800-799-SAFE (7233). Live to tell…Y
Sunday, May 13, 2012
Celebrating Mom
I have a lot of influential and inspirational women in my life, but I only have one mother and she embodies much more than I can ever put into words. Happy Mother's Day, Mami. ♥
I made a couple of handmade gifts for her. The first gift is this mini album using the new spool shaped chipboard by Maya Road. I think she will like it.
My FAVORITE project is this one. It's a spin off of my garden themed coin purse. This is a book with a bunch of my original garden photography. It's a big hit with others that have seen it so I know she will just love it too!
I'm not crazy about my handwriting but I wanted the book to be intimate. Plus I didn't embellish it because I didn't want to take away from the photos. FYI --the paper I used from cover to cover is DCWV's Tattered Time...I dig. :)
If you are a mother, Happy Mother's Day to you!
Subscribe to:
Posts (Atom)


